
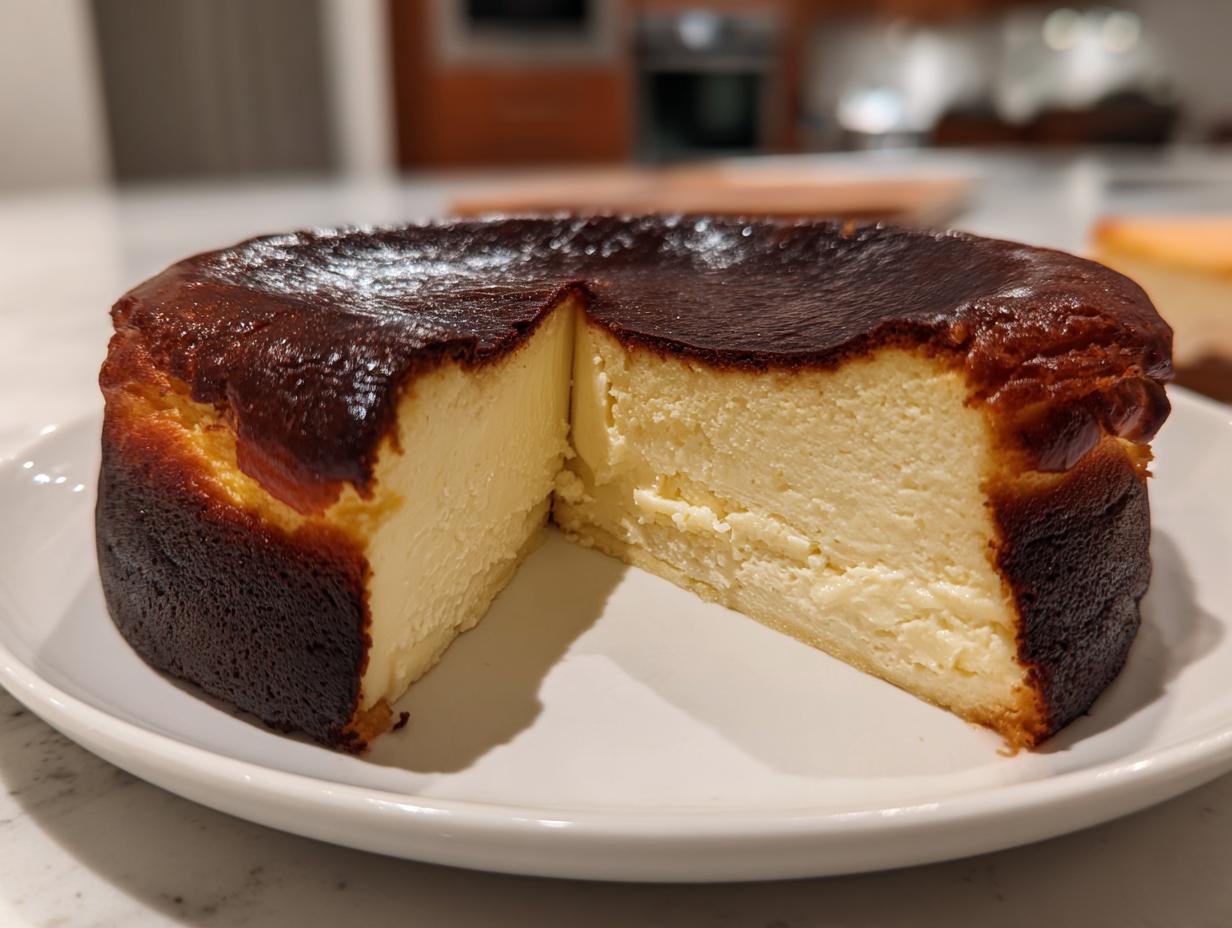
I am telling you, there’s nothing quite like that moment when you pull a Basque Cheesecake from the oven. You get that deeply caramelized, almost-black, cracked top, and everyone gasps. But the real magic? That top hides the silkiest, creamiest center you’ve ever tasted! This recipe, the Best Crustless Burnt Basque Cheesecake, delivers that decadent contrast without any of the usual fuss. Forget difficult water baths and complicated crusts—we’re focused on simple ingredients that create something truly gourmet. This is exactly what Little Kitchen Diary is all about: bringing those showstopper, **impressive baking recipes** right into your busy home kitchen.
- Why This Basque Cheesecake Recipe is a Kitchen Diary Favorite
- Ingredients for the Ultimate Basque Cheesecake
- How to Prepare Your Burnt Basque Cheesecake Recipe
- Cooling and Chilling: Essential Steps for Perfect Basque Cheesecake Texture
- Serving Suggestions for Your Decadent Dessert Ideas
- Variations: Adapting Your Basque Cheesecake for Small Bakes
- Storage and Reheating Instructions for Basque Cheesecake
- Frequently Asked Questions About Burnt Basque Cheesecake
- Share Your Basque Cheesecake Masterpiece
Why This Basque Cheesecake Recipe is a Kitchen Diary Favorite
When I first started experimenting with Basque Cheesecake, I was determined to skip the fussy steps that scare most home cooks away. This version skips the crust entirely, meaning fewer ingredients and less mess overall. It’s the perfect example of a showstopper dessert that is actually incredibly simple to execute.
- It’s completely crustless—pure, creamy indulgence!
- No scary water bath required, ever.
- The texture contrast between the top and center is just unbeatable.
Achieving the Perfect Creamy Cheesecake Center
The secret to that velvety mouthfeel is all about temperature and technique, not fancy gadgets. We use all room-temperature ingredients here. When you mix the cream cheese gently and fold in the cream lightly at the end, you keep just enough air in the batter. This creates that ultra-luxurious, **Silky Smooth Cheesecake Center** you dream about. Trust me; don’t rush that step!
The Magic of a No Water Bath Cheesecake
This is where we embrace the ‘burnt’ look! We crank the heat way up. Baking your **Basque Cheesecake** at 400°F is non-negotiable because that intense blast of heat is what creates that deep caramelization on top. You absolutely do not need to mess around with a water bath here. High heat delivers the rustic look and sets the edges beautifully, making this a truly **Easy Cheesecake Tutorial** success.
Ingredients for the Ultimate Basque Cheesecake
The beauty of this San Sebastian Cheesecake is how few components it needs! Seriously, you don’t need complicated additions when the core ingredients are this high quality. You’ll notice right away that we aren’t messing around with a crust, keeping this recipe simple and perfectly decadent. Don’t even think about touching the low-fat stuff—if you want that signature velvety texture, only full-fat cream cheese will do here!
- 900g full-fat cream cheese, softened to room temperature
- 1 1/4 cups granulated sugar
- 6 large eggs, room temperature
- 2 cups heavy cream
- 1 teaspoon vanilla extract
- 1/4 cup all-purpose flour
Ingredient Notes and Substitutions
Here’s my expert tip: You absolutely must use full-fat cream cheese, and make sure it’s fully soft! If it’s cold, your batter will have lumps, and we want that silky center, right? Because this is a **Crustless Cheesecake**, you don’t need graham crackers or butter for the base. Also, make sure your eggs are sitting out with the cream cheese; room temperature ingredients blend so much better together. Sometimes, if I feel like the vanilla needs a little boost, I’ll sneak in a tiny bit of vanilla extract—you can find my favorite method in my guide to easy vanilla buttercream, though for the cheesecake, stick to the recipe!
How to Prepare Your Burnt Basque Cheesecake Recipe
Alright, this is where the fun really begins! People think making a Basque Cheesecake is complicated because of that dark top, but I promise you, the method is actually incredibly straightforward—it’s all about high heat and respecting the ingredients. We’re following the steps below precisely, so pay close attention, especially to the parchment paper part. It’s that rustic look and the incredible texture that make this dessert worth every second!
Preparing the Pan and Oven for the Basque Cheesecake
First things first: get that oven blazing hot to 400°F (200°C). Next, tackle your 9-inch springform pan. You need two big pieces of parchment paper, but here’s the trick: overlap them so they stick way up over the sides of the pan—like messy, tall walls! This paper will bubble up during baking and give you those signature, craggy, rustic edges that we love. Don’t worry about making it neat; messy is authentic here.
Mixing the Creamy Cheesecake Batter
Start by beating that softened cream cheese until it’s perfectly smooth—zero lumps! Then, slowly beat in your sugar. Next, add the eggs one at a time, and this is crucial: only mix until *just* combined after each egg. If you overmix once the eggs are in, you introduce too much air, and that ruins the custardy center of your **Basque Cheesecake**. Finally, sift that small amount of flour right over the top and gently fold it in with a spatula until it disappears. That batter is going to be thin, don’t panic!
Baking for the Caramelized Top Dessert Finish
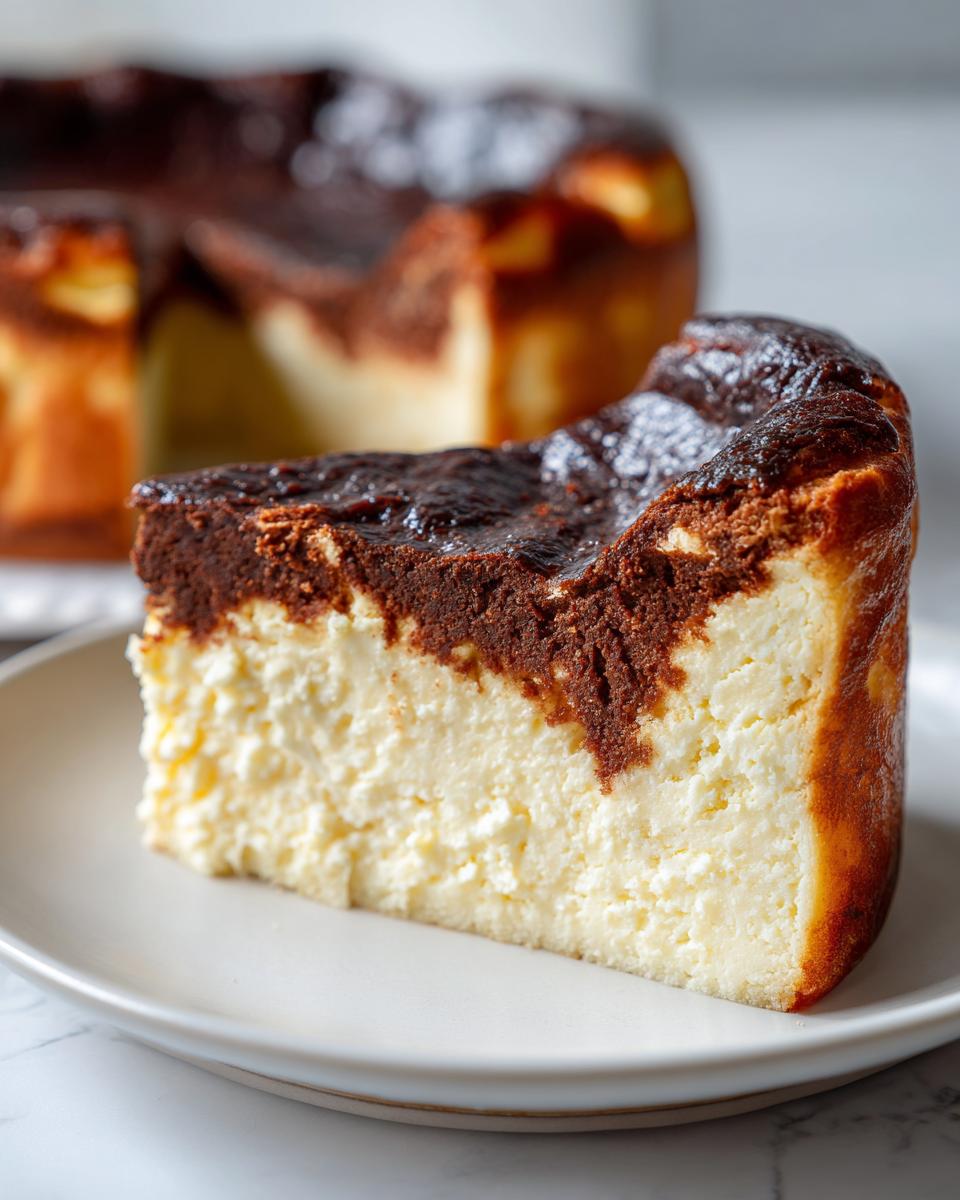
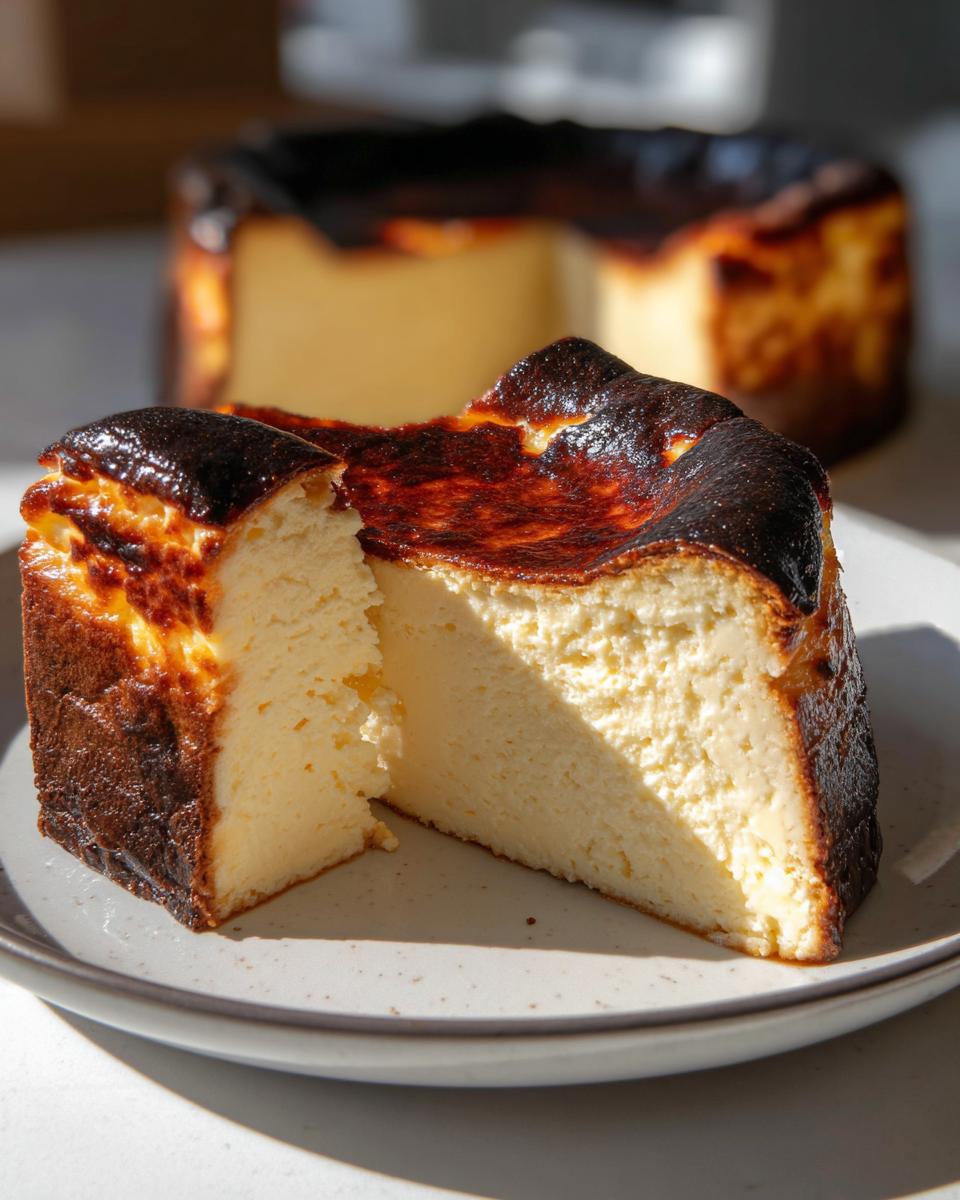
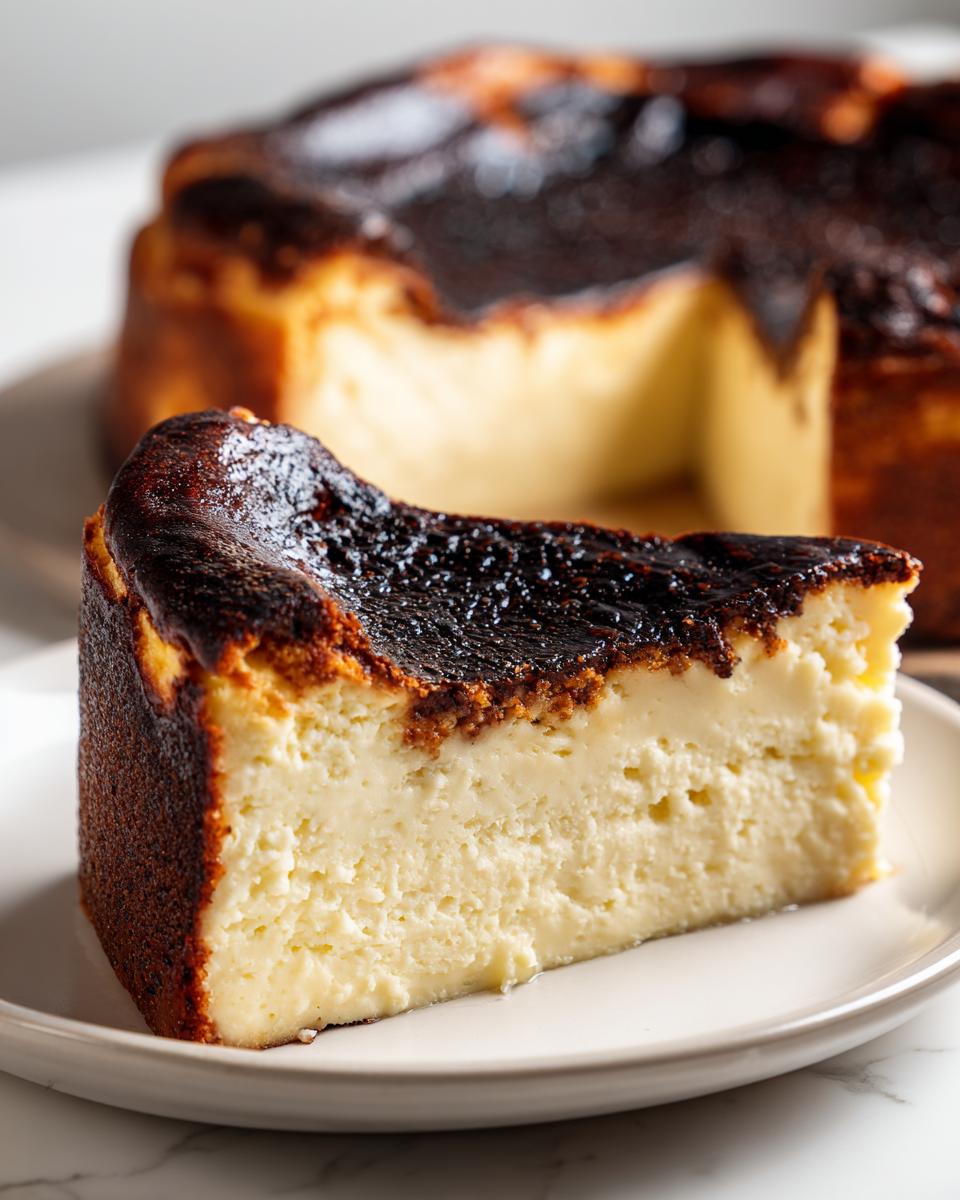
Pour that thin batter into your prepared, high-sided pan and slide it into the hot oven. Bake for about 50 to 60 minutes. You are looking for a top that is dark brown, maybe even black spots, but when you gently give the pan a little shake, the center MUST still wobble significantly, like thick jello. That wobble is your signal that it’s going to set perfectly once it cools down. That beautiful look is what makes it a true **Caramelized Top Dessert**!
Cooling and Chilling: Essential Steps for Perfect Basque Cheesecake Texture
Okay, stop right there! You’ve pulled your beautiful, dark **Basque Cheesecake** out of the oven, and I know the temptation is real to slice into it right then and there. But listen to me: the cooling process is just as important as the mixing. This is the stage that guarantees that dreamy texture. You have to follow this two-part cooling method to lock in that custard-like center. Resist the urge to rush it; patience earns you the **Perfect Cheesecake Texture**!
First, let it chill out on a wire rack on the counter. It needs about two full hours to cool down slowly. During this time, you’ll notice the super-wobbly middle starts to sink right down—that’s exactly what you want! Once it’s back at room temperature, cover it loosely and move it to the fridge. You absolutely have to chill this for a minimum of six hours, though honestly, overnight is the real game-changer. That chilling time transforms the cake from a soft dessert into that dense, rich texture we see in gorgeous cakes like my French Silk Pie—just as important for mouthfeel!

Serving Suggestions for Your Decadent Dessert Ideas
Okay, your **Basque Cheesecake** has chilled overnight, and it looks spectacular with those tall, craggy parchment sides. Now for the best part: presentation! Remember my golden rule for serving this masterpiece? It has to come out of the fridge and sit on the counter for at least 30 minutes, maybe an hour, before cutting. Serving it as a true **Room Temperature Dessert** is non-negotiable if you want that melt-in-your-mouth center. Forget complicated frostings; this Spanish Dessert takes care of itself!
Keep it rustic! Gently peel away those parchment paper walls—it creates a gorgeous, natural border on your plate. I usually just dust mine with a tiny bit of powdered sugar, but fresh raspberries or even a sprinkle of sea salt if you want to lean into that sweet/savory combo looks divine. If you’re looking for other great options for your next party spread, check out what Molly recommends on her site, where she shares her take on the creamy cake—I always check out her recipe when I’m looking for inspiration on presentation!
If you pair this beauty with a simple coffee or an espresso, you’re set. For more delicious ideas for your next gathering, check out how I make my easy classic party appetizer!
Variations: Adapting Your Basque Cheesecake for Small Bakes
You know how sometimes you want the decadent taste of Basque Cheesecake, but you aren’t hosting a huge crowd? Don’t worry; I totally have you covered there! My favorite little trick is turning this recipe into an Easy Loaf Pan Cheesecake. It bakes faster and is such a perfect size for a smaller gathering or just having an amazing dessert ready during the week.
The general rule is simple: for a standard loaf pan—about an 8.5 by 4.5-inch size—you should scale the recipe down to use about two-thirds of the batter for that round cake. Then, just watch the oven time carefully. Instead of 60 minutes, start checking around 40 to 45 minutes. You still want that deep brown color and a slight wobble, just like the big guy!
I know Adam over at Recipes by Adam details his loaf pan adventures perfectly, and it’s a great resource for visualizing how the edges should look when you use that smaller shape. It makes slicing up those squares so much easier than cutting into a huge round one. Plus, if you’re into making apple cheesecake bars, this variation gives you a similar handheld feel, but with that signature burnt top!
Storage and Reheating Instructions for Basque Cheesecake
So, you managed not to eat the entire **Basque Cheesecake** in one sitting? Good job! Leftovers store beautifully, but you have to treat them right if you want to protect that creamy center. Always store the leftover cake in the refrigerator under loose plastic wrap. Don’t wrap it too tightly, or you might trap moisture that ruins the crustless top.
When you’re ready for another slice—maybe with my easiest 3-ingredient Oreo fudge for company—you must take it out at least an hour before serving. Just like the first time, this cake tastes best when it’s allowed to warm up slightly. That refrigerated chill makes it dense; room temperature brings back that gorgeous, soulful wobble!
Frequently Asked Questions About Burnt Basque Cheesecake
I get so many questions about getting this Basque Cheesecake just right, and I love talking through the little details that make all the difference. Most people worry about the burnt top or getting that perfect interior. Don’t worry, we’ve all been there!
Why is my Basque Cheesecake not burning on top?
If you aren’t getting that signature dark color, it almost always comes down to the heat! Remember, this is a high-heat bake. If your oven runs cold, you won’t get the caramelization you need for that gorgeous Caramelized Top Dessert look. Make sure your oven temperature is accurate, and try placing the rack a little closer to the top heating element for the last 10 minutes. It needs that direct heat blast!
Can I use low-fat cream cheese for this Crustless Cheesecake?
Oh, absolutely not! If you are going to the trouble of making a **Crustless Cheesecake**, you have to use the good stuff. Low-fat or non-fat cream cheese just doesn’t have the fat content required to give you that rich, dense, yet custardy feel. You need that high-fat content for that unforgettable **Creamy Cheesecake** center. Stick to the full-fat blocks, softened completely, and you’ll be rewarded!
Is the center supposed to be completely set when I take the San Sebastian Cheesecake out?
This is the biggest scare factor for new bakers, but I promise you, it’s right! When you pull your **San Sebastian Cheesecake** out, the center should look almost uncooked; it needs a serious wobble when you nudge the pan. If it comes out stiff, it will be dry when it cools. That wobble means you’ve hit the sweet spot, and it will firm up perfectly during the chilling time, resulting in that marvelous texture. If you’re looking for other easy recipes while you wait, check out my guide for Crockpot Marry Me Chicken!
Share Your Basque Cheesecake Masterpiece
Whew! That’s it! You’ve created something genuinely rustic and gourmet. I really, really hope you loved making this **Basque Cheesecake** just as much as I love eating it. Now that you’ve mastered the technique, I’d be thrilled if you gave this recipe a star rating down below. Did you try the loaf pan version? Let me know in the comments how it turned out! If you snap a picture, tag me on social media so I can see your beautiful, caramelized tops! If you have any lingering questions or want to just say hello, feel free to reach out via my contact page!
PrintThe Best Crustless Burnt Basque Cheesecake

Make this impressive, rustic Basque Cheesecake with a creamy, silky center and a perfectly caramelized, burnt top. This recipe requires minimal ingredients and no water bath, making it an easy yet decadent dessert for any occasion.
- Prep Time: 15 min
- Cook Time: 60 min
- Total Time: 7 hours 15 min
- Yield: 10 servings 1x
- Category: Dessert
- Method: Baking
- Cuisine: Spanish
- Diet: Vegetarian
Ingredients
- 900g full-fat cream cheese, softened to room temperature
- 1 1/4 cups granulated sugar
- 6 large eggs, room temperature
- 2 cups heavy cream
- 1 teaspoon vanilla extract
- 1/4 cup all-purpose flour
Instructions
- Preheat your oven to 400°F (200°C). Take out a 9-inch springform pan. Line the pan with two large pieces of parchment paper, overlapping them and letting the edges stick up high over the sides of the pan. This helps contain the batter and creates the rustic edges.
- In a large bowl, use an electric mixer to beat the softened cream cheese until it is completely smooth and has no lumps. Scrape down the sides of the bowl often.
- Gradually add the sugar to the cream cheese mixture and beat until fully combined and creamy.
- Add the eggs one at a time, mixing well after each addition until just combined. Do not overmix once the eggs are in.
- Slowly mix in the heavy cream and vanilla extract until the batter is uniform.
- Sift the flour over the batter and gently fold it in using a spatula until no streaks of flour remain. The batter will be thin.
- Pour the thin batter into the prepared springform pan.
- Bake for 50 to 60 minutes. The top should be deeply caramelized, almost black in spots, and the edges should look set. The center should still have a significant wobble when you gently shake the pan.
- Remove the cheesecake from the oven. Let it cool completely on a wire rack at room temperature for about 2 hours. The center will sink as it cools.
- Once cooled, cover the pan loosely with plastic wrap and chill in the refrigerator for at least 6 hours, or preferably overnight, for the best silky smooth texture.
- Before serving, carefully remove the parchment paper sides. Serve the Basque Cheesecake at room temperature for the creamiest texture.
Notes
- For a smaller, easy-to-serve bake, you can adapt this recipe for a standard loaf pan (approximately 8.5 x 4.5 inches). Use about two-thirds of the recipe ingredients and bake at the same temperature, checking for doneness around 40-45 minutes.
- Serving the cheesecake at room temperature enhances the custardy, soft center texture that defines this dessert.
- Do not use a water bath; the high heat is necessary to achieve the signature burnt exterior.
Nutrition
- Serving Size: 1 slice
- Calories: 450
- Sugar: 35g
- Sodium: 250mg
- Fat: 35g
- Saturated Fat: 22g
- Unsaturated Fat: 13g
- Trans Fat: 0.5g
- Carbohydrates: 28g
- Fiber: 0g
- Protein: 8g
- Cholesterol: 180mg