

Sometimes, you just need a truly decadent chocolate pie, right? We all get busy, and making something truly spectacular feels like a luxury we can’t afford time-wise. But trust me, rediscovering that joy in creating a showstopper dessert is worth every second. That’s why I’m sharing my absolute favorite recipe for the classic french silk pie. This isn’t just any chocolate filling; this recipe guarantees that perfectly rich, velvety, and utterly smooth mousse-like texture everyone dreams about. For me, pulling this gorgeous creation out of the fridge for family dessert nights reminds me exactly why I started this little kitchen diary in the first place—making the time for things that feed the soul.
You can check out my recipe for easy no-bake mini cheesecakes if you need something quicker, but when you want that showstopper, this is the one.
- Why This french silk pie Recipe Is Your New Showstopper Chocolate Dessert
- Ingredients Needed for the Ultimate french silk pie
- Preparing Your Buttery Pie Crust Dessert Base
- Step-by-Step Instructions for Making french silk pie
- Topping Your Dessert for Special Occasions
- Tips for Success with Your Easy Chocolate Silk Pie
- Variations on the Classic french silk pie
- Storing and Serving Your Melt in Your Mouth Pie
- Frequently Asked Questions About french silk pie
Why This french silk pie Recipe Is Your New Showstopper Chocolate Dessert
I know we’re all busy, but this decadent chocolate pie proves you don’t have to sacrifice quality for speed. This recipe is my go-to because it’s incredibly reliable. When you follow these steps, you get that signature rich chocolate flavor every single time. It really is built to impress at any gathering, whether it’s a major holiday or just a Tuesday night craving.
- It’s surprisingly simple—the main work is just mixing, not baking!
- The texture is unbeatable: perfectly light and mousse-like, not dense or grainy.
- It’s a true ‘wow’ factor dessert you can manage even after a long day.
If you are making something extra special, you might also love my recipe for the chocolate caramel toffee crunch cake.
Achieving the Perfect Creamy Silk Pie Filling Texture
The secret sauce to this dessert isn’t just the chocolate; it’s the air we whip into it! Getting that creamy silk pie filling texture—the one that makes you close your eyes when you take a bite—comes down to treating those egg whites just right. We beat them until they form stiff peaks, which incorporates so much air. When you carefully fold them into the smooth, rich chocolate base, it transforms into that luxurious, light-as-air mousse you expect from a truly great french silk pie.
Ingredients Needed for the Ultimate french silk pie
Okay, friends, here is what you need to gather to make this truly decadent chocolate pie. Remember, the quality of your chocolate really matters here, so use something you genuinely love eating on its own! Since this is a chilled pie, we aren’t doing a ton of baking, so precision in measuring the filling components is key to getting that ultimate smooth texture.
You’ll need these essentials:
- 1 (9 inch) pre-baked pie crust (or you can use a homemade buttery crust if you’re feeling ambitious!)
- 8 ounces unsweetened chocolate, melted and cooled slightly – make sure it’s good quality!
- 1 cup granulated sugar
- 4 large eggs, separated — we respect the process here!
- 1 teaspoon vanilla extract
- 1/2 cup cold unsalted butter, cut into pieces
- 1/4 teaspoon salt
- 1 cup heavy whipping cream, cold
- 2 tablespoons powdered sugar (just for the topping)
- Chocolate shavings (because presentation matters!)
If you’re planning ahead for a holiday table, this might pair well with a slice of my pumpkin cream cheese bread later in the week!
Preparing Your Buttery Pie Crust Dessert Base
Okay, listen up! This is where some people take a shortcut, and while a good store-bought crust is fine in a pinch, we are aiming for a truly showstopping buttery pie crust dessert here. My recipe calls for a fully pre-baked 9-inch crust. If you are using store-bought, that’s cool—just make sure it’s fully cooled before we pour anything in. If you’re feeling the spirit of home cooking, you absolutely should make a homemade version. It makes such a difference in the final texture!
If you want to learn how to make a fantastic crust from scratch, I have a great guide on making a sturdy loaf crust for my Italian bread recipe that shares great foundational dough handling tips you can adapt. The key thing for this rich pie, though, is that the crust has to be totally cool—otherwise, hello melted filling!
Step-by-Step Instructions for Making french silk pie
Alright, let’s get this indulgent dessert assembled! This is the part where your patience pays off, so don’t rush the mixing—we are building layers of texture here to ensure we get that incredible, light feel. Remember, the goal is an incredibly velvet chocolate dessert, and that comes from how we handle these ingredients.
First things first, make sure that crust you prepared is completely cool; I mean cookie-cool! Next, in a medium bowl, you’ll mix your slightly cooled, melted unsweetened chocolate right into the granulated sugar. Get that smooth. Then, slowly beat in the four egg yolks one by one until they are totally happy in the chocolate mixture. Finish this base with your vanilla extract. If you want to practice making the components for a similar dessert ahead of time, my easy brown sugar cinnamon pear crisp is a great way to practice careful ingredient folding!
While that’s sitting, you need to tackle the whites. In a separate, sparkling clean bowl, beat those four egg whites with that tiny pinch of salt until you reach stiff peaks. Do not overbeat—we want firm but fluffy, not dry! Now, go back to your chocolate base and beat in your cold butter pieces until you get a beautifully smooth mixture. This is where the richness gets locked in.
For the next step, which is vital, we need to lighten things up! Gently fold about one-third of your beaten egg whites into the chocolate mixture first. This loosens up that thick base. Then, very carefully, fold in the rest of the whites. We’re using a folding motion, not stirring, to keep all those lovely air pockets intact. Pour this gorgeous filling right into your cooled pie crust and smooth the top off nicely. You can peek at how others approach their french silk pie recipes for inspiration, but stick to the folding!
Mastering the Mousse Pie Recipe Filling Assembly
The assembly is everything for this mousse pie recipe. Think about it—we are combining a heavy, rich chocolate-butter base with these delicate, airy egg whites. That’s why separating the folding matters! By loosening the base first, you prevent the egg whites from collapsing when you add the rest. Go slow, scraping from the bottom up. This gentle handling is what separates a decent chocolate pie from the truly melt-in-your-mouth experience.
Crucial Chilling Time for the french silk pie
Seriously, you cannot rush this part! The pie needs a minimum of four hours in the refrigerator. Why? Because that time allows the butter and chocolate to firm up enough to support all that air we just folded in. If you cut it early, you end up with soupy chocolate goo instead of that perfect sliceable creamy silk pie filling. Trust the chill time; it sets the structure beautifully.
Topping Your Dessert for Special Occasions
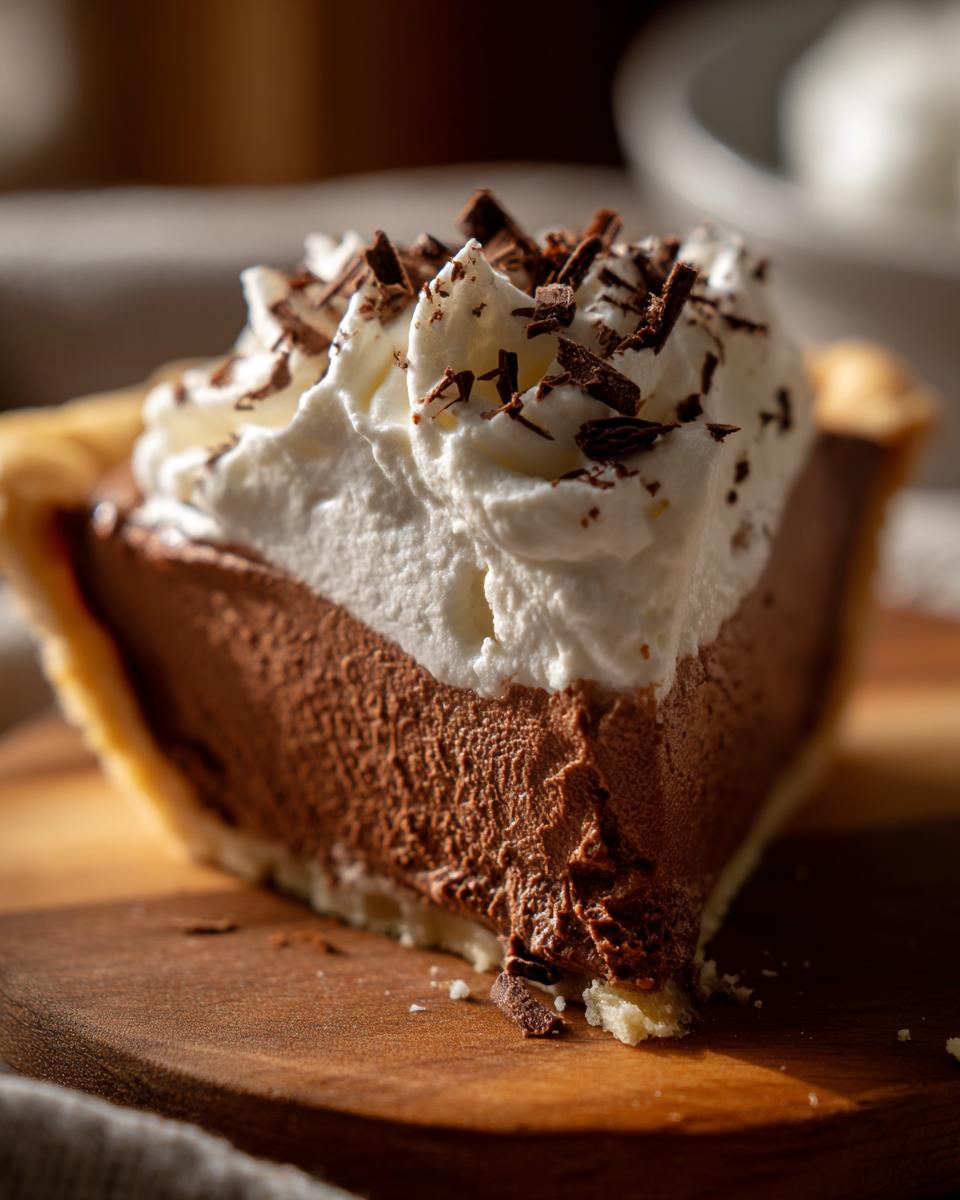
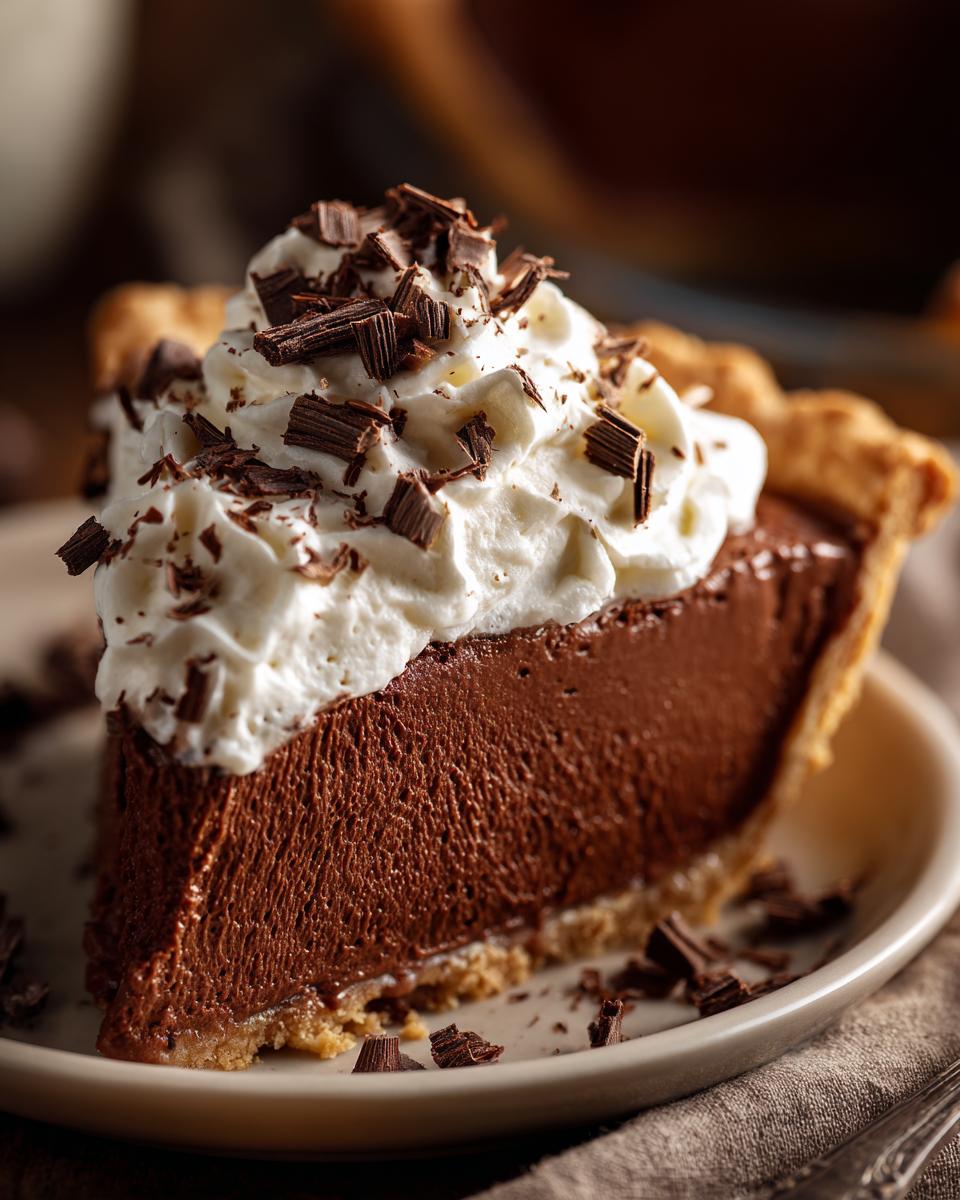
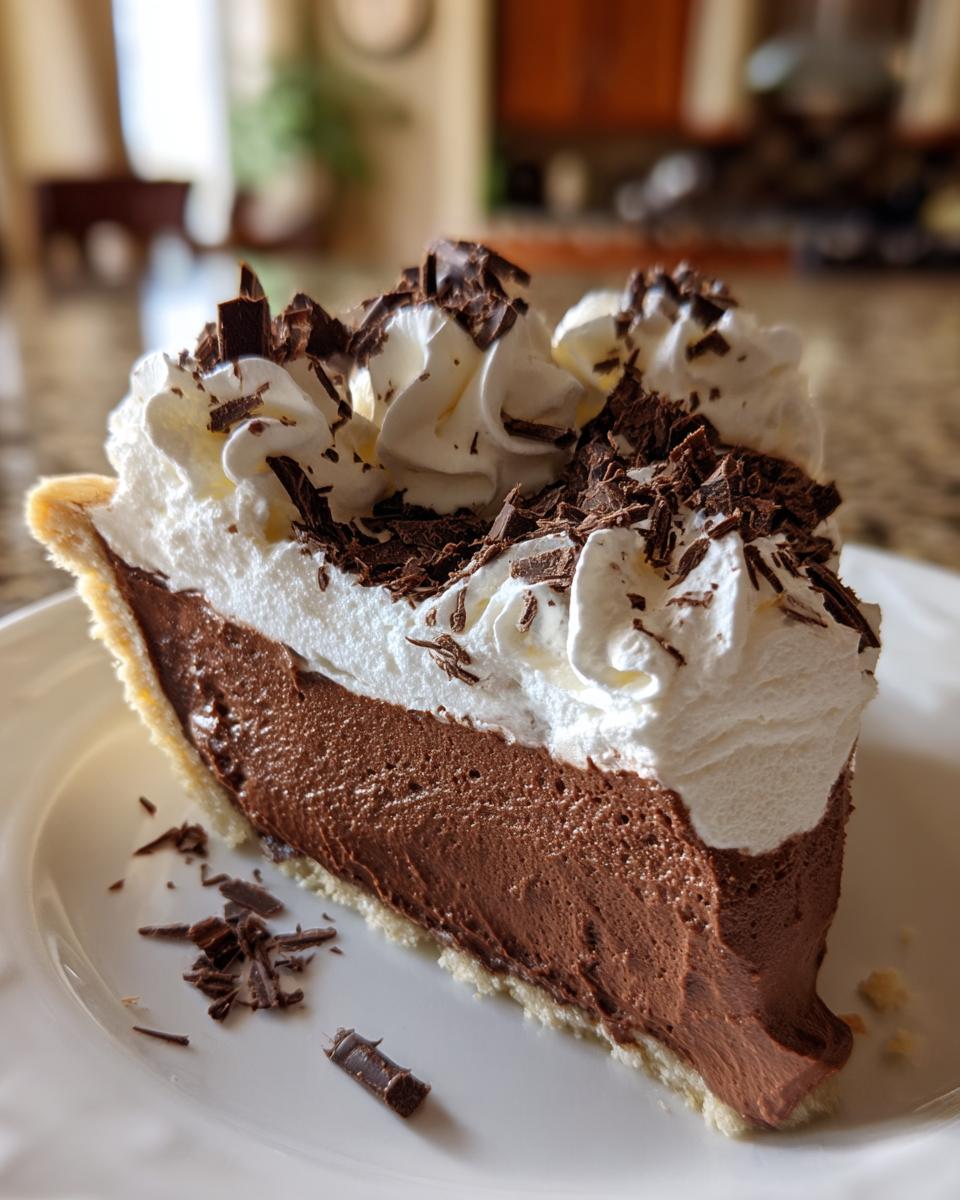
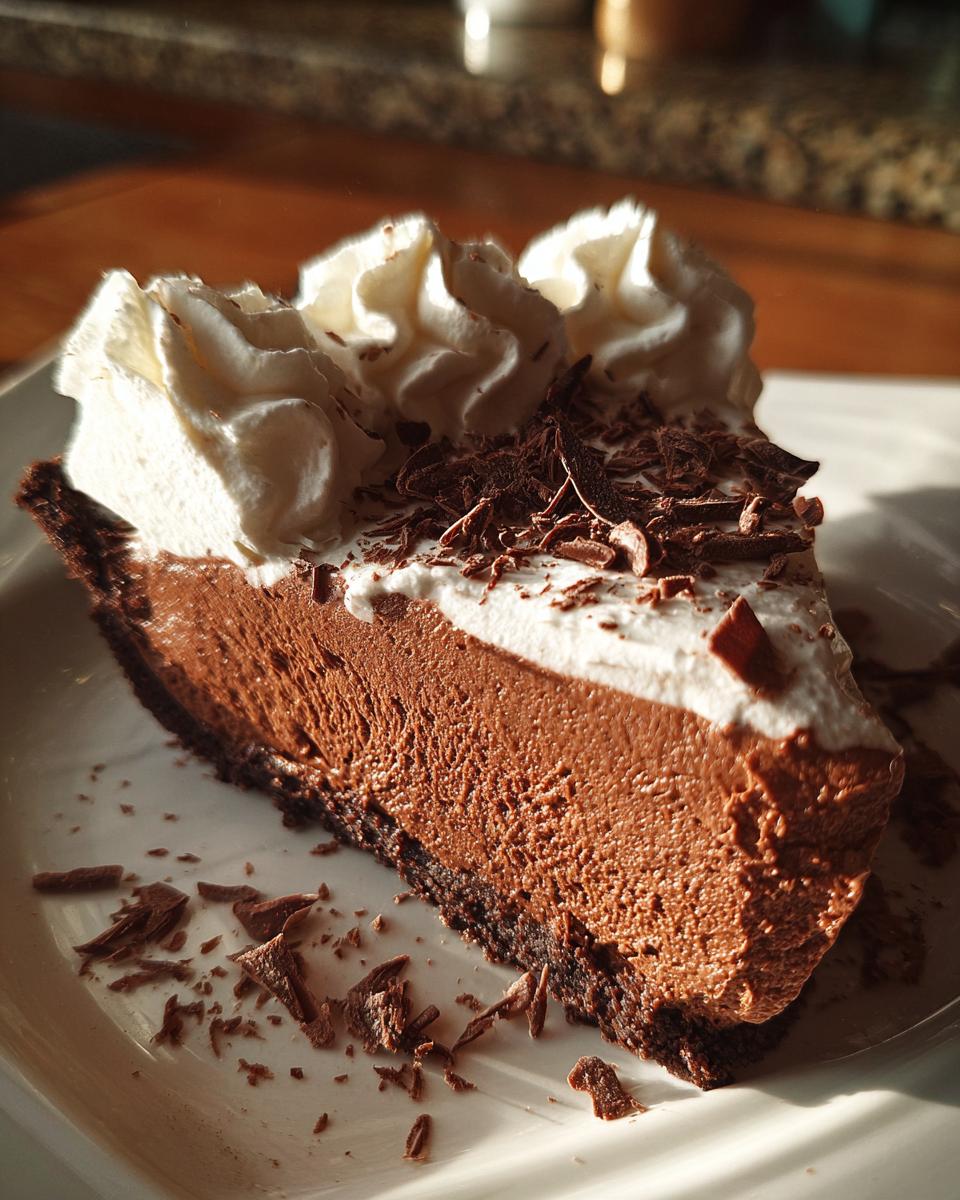
Once that luxurious french silk pie filling has set, it’s time for the grand finale: the topping! We need a beautiful cloud of homemade whipped cream topping to balance out all that deep chocolate richness. Remember the ingredients? You only need that cold heavy whipping cream and those two tablespoons of powdered sugar.
Whip it up until you get soft peaks. If you’re planning to spread it with an offset spatula over the entire pie, stop right at soft peaks; it’s easier to handle that way. If you want tall, defined dollops that hold their shape perfectly for piping, you can go just a little further toward stiff peaks, but be careful not to turn it into butter! I love piping mine gently around the edge, then finishing the center with a scattering of chocolate shavings. It just screams ‘indulgent dessert ideas’!
If you want to see another fun way we use whipped cream, check out my recipe for whipped hot chocolate; it uses similar principles!
Tips for Success with Your Easy Chocolate Silk Pie
Even though we call this an easy chocolate silk pie, there are just a couple of tiny points that take it from good to absolutely knockout quality. First, don’t forget the chilling time we talked about—it’s just as important as the mixing! Seriously, resist the urge to slice it early; structure matters.
Another thing people often miss is the quality of the egg whites. Make sure your bowl is totally free of grease or water when you whip them; any fat will stop those vital stiff peaks from forming. From my experience, right before I add the melted chocolate to the butter, I let the chocolate cool until it’s just barely warm to the touch. If it’s too hot, it can start to deflate the butter mixture you just creamed. Just warm enough to be liquid, nothing more!
If you want to see how I handle other fussy fillings, my notes on making a fail-proof egg custard share similar principles about temperature control. And hey, if you’re interested in other recipe styles, take a look at the famous Joanna Gaines French Silk Pie recipe for comparison!
Variations on the Classic french silk pie
While this recipe delivers the perfect, classic decadent chocolate pie, sometimes I like to shake things up a little bit! It’s still surprisingly simple to tweak this base for a whole new experience. For instance, if you’re a big coffee person like my brother, try whisking in about a teaspoon of instant espresso powder right along with your vanilla extract. It creates a fantastic mocha flavor that pairs beautifully with the rich chocolate—it becomes an incredible showstopper chocolate dessert!
And let’s talk crusts for a second. While the buttery crust is traditional, sometimes I want something crunchier, especially if I’m making this an easy chocolate silk pie for a casual night. Using a crushed Oreo or chocolate wafer crust works wonderfully and cuts down on the prep time since you just press them into the dish. If you are searching for more crust ideas that don’t require baking, you might want to check out my guide on easy ice cream pie recipes that explore different press-in bases.
If you wanted to see a dairy-free take on this concept, I saw an interesting dairy-free French Silk Pie recipe pop up, which is perfect if you’re hosting someone with dietary restrictions!
Storing and Serving Your Melt in Your Mouth Pie
Now that you’ve made this truly amazing, melt in your mouth pie, you want to make sure it stays magnificent, right? This dessert does not like heat, so the serving rule is simple: it must be served cold! Keep it covered tightly in the refrigerator. If you want the absolute best, silkiest texture, try to eat it within two days.
After that, the airy filling starts to settle just a tiny bit. But honestly, chances are high it won’t last past day one anyway! If you’re storing extra, a simple plastic wrap tent over the top works perfectly. If you’ve already added the whipped cream topping, you might want to use a container with a taller lid so you don’t smash those beautiful peaks. Speaking of creamy fillings, if you need a warm treat next time, check out my guide to creamy stovetop cheesy rice!
Frequently Asked Questions About french silk pie
I always get questions when I post this pie because people worry they won’t get that perfect texture. Let’s clear up a few things so you can nail this melt in your mouth pie every single time and feel confident serving up this gorgeous dessert for your next celebration!
Is this the Traditional French Dessert?
That’s a fun question! Nope, this isn’t what they’d call ‘traditional’ in France. It’s actually a classic American invention—our own indulgent take on a rich, creamy texture. We just borrow the fancy name because the filling is so incredibly silky, right?
Can I make the french silk pie filling without using a mixer?
Technically, yes, but I wouldn’t recommend it for this recipe. Getting those egg whites to truly stiff peaks takes serious elbow grease without an electric mixer. Remember, the air from those peaks is what gives us that light, velvet chocolate dessert structure. It’s really tough to whip enough air in by hand!
If you are looking for other dishes that require a bit less specialized gear, you should take a look at my slow cooker pot roast guide; that’s pure armchair cooking!
And just to cover crust concerns: you mentioned alternatives above. As I said, a basic buttery pie crust dessert works, but feel free to use a chocolate wafer crust for a fun twist if you need an even easier assembly!
PrintClassic French Silk Pie: Rich and Creamy Chocolate Dessert

Make this classic French Silk Pie for a truly decadent dessert. This recipe delivers a rich, velvety chocolate filling with a smooth, mousse-like texture set in a buttery crust. It is a showstopper for any special occasion.
- Prep Time: 30 min
- Cook Time: 10 min
- Total Time: 4 hours 40 min
- Yield: 8 servings 1x
- Category: Dessert
- Method: Chilling
- Cuisine: American
- Diet: Vegetarian
Ingredients
- 1 (9 inch) pre-baked pie crust (or use a homemade buttery crust)
- 8 ounces unsweetened chocolate, melted and cooled slightly
- 1 cup granulated sugar
- 4 large eggs, separated
- 1 teaspoon vanilla extract
- 1/2 cup cold unsalted butter, cut into pieces
- 1/4 teaspoon salt
- 1 cup heavy whipping cream, cold
- 2 tablespoons powdered sugar (for topping)
- Chocolate shavings (for garnish)
Instructions
- Prepare your 9-inch pie crust and let it cool completely.
- In a medium bowl, combine the melted chocolate and granulated sugar. Mix well.
- Beat in the four egg yolks one at a time until fully incorporated into the chocolate mixture. Stir in the vanilla extract.
- In a separate, clean bowl, beat the four egg whites with the salt until stiff peaks form. Set aside.
- In another bowl, beat the cold butter until creamy. Gradually beat the chocolate mixture into the butter until smooth.
- Gently fold one-third of the beaten egg whites into the chocolate mixture to lighten it. Then, fold in the remaining egg whites until just combined, being careful not to deflate the mixture. You want a light, airy texture.
- Pour the creamy silk pie filling into the cooled pie crust. Smooth the top.
- Chill the pie in the refrigerator for at least 4 hours, or until the filling is firm.
- Before serving, whip the heavy whipping cream with the powdered sugar until soft peaks form. Spread or pipe the homemade whipped cream topping over the chilled pie.
- Garnish with chocolate shavings. Slice and serve this melt in your mouth pie immediately.
Notes
- For the best mousse pie recipe texture, ensure your egg whites are beaten to stiff peaks.
- If you prefer a shortcut, you can use a store-bought chocolate wafer crust, though a buttery crust is traditional.
- Chill time is important; do not rush setting the filling for the perfect texture.
Nutrition
- Serving Size: 1 slice
- Calories: 450
- Sugar: 35g
- Sodium: 150mg
- Fat: 32g
- Saturated Fat: 18g
- Unsaturated Fat: 14g
- Trans Fat: 0g
- Carbohydrates: 38g
- Fiber: 3g
- Protein: 7g
- Cholesterol: 120mg