
Doesn’t it drive you crazy when you try to make a lovely root vegetable side dish and end up with something either rock-hard in the middle or a soggy mess? I spent way too long battling dry beets and undercooked squash before I decided to take back control of my simple cooking. You can read a little more about that journey over at the About page if you’re curious! That’s why I’m so thrilled to share this recipe for our Foolproof Baked Sweet Potatoes. This method, which I logged in my little kitchen diary after so many tries, delivers the absolute best result: perfectly **baked sweet potatoes** with that deeply satisfying, fluffy inside and a deliciously crispy, seasoned skin. Welcome back to real, simple cooking!
- Why This is the Best Way to Bake Sweet Potatoes (The No-Foil Secret)
- Ingredients for Perfect Oven Baked Sweet Potatoes
- Simple Steps: How to Prepare Baked Sweet Potatoes
- Tips for the Perfect Baked Potato Method
- Transforming Your Baked Sweet Potatoes: Savory Variations
- Storage and Meal Prep Sweet Potatoes
- FAQ About How to Bake Sweet Potatoes
- Nutritional Estimate for This Easy Sweet Potato Recipe
- Share Your Simple Sweet Potato Recipe Success
Why This is the Best Way to Bake Sweet Potatoes (The No-Foil Secret)
If you’ve ever wrapped your potatoes in foil, you might be wondering why everyone insists on ditching that method now. Trust me, I used to wrap mine too! But wrapping them traps steam so thoroughly that you end up essentially boiling the outside of the potato. To get that amazing, slightly wrinkled, crackly skin that gives way to soft insides, you have to let the oven air work its magic. This technique, perfected over weeks of testing here in the Little Kitchen Diary, involves baking the potatoes directly on the center rack. It’s the simple secret to making the **best way to bake sweet potatoes** happen every single time since we learned how to make them tender, like this great recipe suggests.
Achieving Fluffy Baked Sweet Potatoes Every Time
The inside fluffiness is all about steam and time management. Before anything else, you’ve got to prick them deeply with a fork—I mean really jab them! This gives all that internal moisture a path to escape instead of turning your potato into a dense brick. High heat (400°F) helps cook the exterior quickly to seal in air, giving you those beautifully **fluffy baked sweet potatoes** we’re aiming for. Don’t skip the pricking, or you’ll lose that airy texture we worked so hard to achieve!
Ingredients for Perfect Oven Baked Sweet Potatoes
It’s so refreshing that this fantastic **easy sweet potato recipe** requires next to nothing from your pantry! We just need four things, plus whatever wonderful toppings you dream up later. I always buy mine in bunches from the market, making sure they’re similar in size so they finish baking together around the same time. This consistency keeps everything cooking evenly—a big win for me when I’m cooking for a crowd!
Ingredient Notes and Preparation
When we talk about achieving that **crispy skin sweet potato** texture, the oil and salt are doing the heavy lifting here. You need olive oil—not melted butter, as butter tends to burn at this high temperature. The oil helps the skin crisp up beautifully in the dry oven heat. And please, use coarse salt! Regular table salt dissolves too fast and can make the skin taste aggressively salty. Coarse salt sticks around, develops flavor, and helps pull moisture from the skin surface during the bake. Remember, uniform size potatoes are your friend for predictable cooking times!
Simple Steps: How to Prepare Baked Sweet Potatoes
Alright, let’s get down to the real business of making these **baked sweet potatoes**. I broke this down into super clear stages because when you follow the sequence exactly, that perfect, soft center just happens! It really is foolproof once you see how simple the process is. Remember, we are aiming for the absolute best result here; no shortcuts that compromise flavor or texture!
Preheating and Initial Prep for Baked Sweet Potatoes
First thing first: get your oven roaring! We need it at 400 degrees Fahrenheit, and make sure that center rack is ready to go. Now, grab those spuds. You absolutely must scrub them clean—I use a firm vegetable brush to get rid of any grit hiding in those crevices. The most important part of this step, which people often rush? Drying them completely. I mean bone dry, using paper towels! Water is the enemy of crispiness, so skip this and you’ve already compromised your **crispy skin sweet potato** dreams. Get that peel completely dry!
Oiling, Seasoning, and Baking the Sweet Potatoes
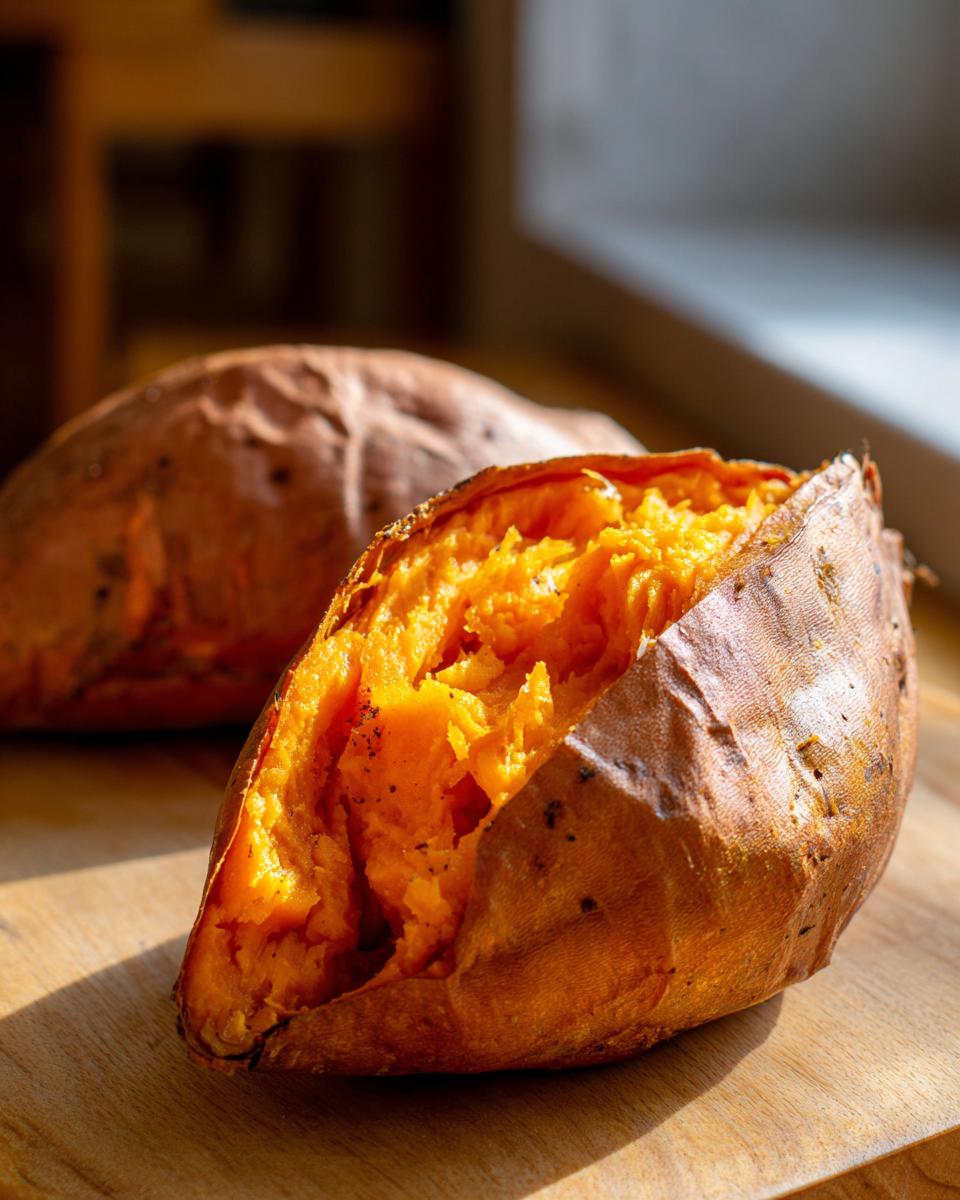
Once dry, you’ll grab a fork and pierce each potato about five or six times, deep into the center. This keeps them from exploding, trust me! Then, drizzle on your olive oil and rub it all over, coating every bit of skin. Salt and pepper go on last. Now, this is key: place the seasoned potatoes directly onto the center oven rack. No pan, no foil, nothing underneath to trap the steam! They need that direct heat. Bake them for 45 to 60 minutes—check them around the 45-minute mark. You’re looking for wrinkled skin and a fork that slides in with zero resistance. If you need other simple ideas while these are baking, you could check out my Spanish Rice Recipe!
Tips for the Perfect Baked Potato Method
Knowing when your **baked sweet potatoes** are done is crucial; nobody wants to cut one open only to find a hard chunk in the middle! The fork test is great, but you should check for a few other signs first. When they are ready, the skin will look slightly shriveled, and the potato will feel slightly tender when you gently squeeze the sides. It should yield quite a bit under light pressure, meaning the inside is soft and steamy.
Don’t cut them open right away! This resting period is as important as the baking itself. Once you pull them out, let them sit on a cutting board for about five minutes. That short rest allows the residual heat to finish softening the starch—that’s what gives you that incredible fluffy texture. If you slice them open immediately, all that steam rushes out, and you can end up losing some of that soft lightness. If you’re looking for other easy, comforting things to master, you might enjoy whipping up some homemade marshmallows someday!
Transforming Your Baked Sweet Potatoes: Savory Variations
Now, these **baked sweet potatoes** are fantastic just with a little salt and pepper, maybe a dollop of butter melting into that hot center. But if you’re like me, and you want to turn this simple side dish into something that really sings, we have to talk savory! Sweet potatoes are so versatile; they handle strong flavors beautifully. This simple baking recipe is the perfect blank canvas for creating a truly memorable **healthy potato side dish**.
Instead of going for the usual brown sugar and cinnamon route, let’s lean into some richer, deeper flavors. We can easily pivot this toward a hearty dinner side or even a light lunch by adding some herbs or strong aromatics right after they come out of the oven. It’s all about using what you have to make something that feels fancy.
Making a Garlic Butter Sweet Potato
This is my go-to change when I’m serving steak or roasted chicken. Once you’ve sliced the potato open and fluffed up that steamy center—remember that crucial 5-minute rest before cutting!—you mix up a quick garlic butter. I usually just melt a tablespoon or two of good butter and stir in a crushed clove of garlic with some fresh chopped chives. That savory mixture gets spooned right into the fluffy interior of your **baked sweet potatoes**.
If you want an even richer experience, you really should look at how they handle garlic over at K-Recipes; their whole Garlic Butter Sweet Potato Bake sounds incredible for a potluck situation! For my version, I keep it simple: butter, garlic, fluff, and maybe a sprinkle of flaky salt on top. It’s heaven, and it takes less than two minutes once your potato is ready.
When you’re done testing out savory options, don’t forget to bookmark some great party recipes, like my Caramelized Onion Dip, for your next gathering!
Storage and Meal Prep Sweet Potatoes
One of the things I love most about mastering the **perfect baked potato method** is how incredibly well they keep! If you’re making a big batch for a weeknight side dish or batch cooking lunches, you absolutely can prepare these ahead of time. That’s why these **meal prep sweet potatoes** are such a staple for me when life gets hectic.
The key here is to let the potatoes cool completely before you store them. Don’t put hot or even warm potatoes into an airtight container; you’ll just steam them again and ruin that crisp skin we worked so hard for!
Once totally cool, you can store them whole—skin and all—in a sealed container or a zip-top bag in the refrigerator. They hold up beautifully for about four days. If you’re storing them that long, I still recommend storing them whole rather than slicing them open.
When it’s time to eat them later, you have a couple of easy options. The best way to restore that wonderful texture is to reheat them whole in a 350°F oven for about 10–15 minutes until they are heated through. If you’re in a real rush, the microwave works too, but you’ll lose any remaining crispiness on the skin. You can get similar results by following the tips shared in this great post about Quick Baked Sweet Potatoes if you need them instantly.
For lunch prep, I sometimes slice them as soon as they cool, store the halves in a container, and then toss them with a little dressing or top them with something like my favorite Greek Yogurt Tuna Salad the next day. They are so much better than buying pre-cooked ones, and you know exactly what went into them!
FAQ About How to Bake Sweet Potatoes
Since starting the Little Kitchen Diary, I’ve learned that every recipe comes with a few lingering questions. It’s all part of the journey of making real food at home! I gathered up the most common things folks ask me about achieving the **perfect baked potato method** for sweet potatoes. Hopefully, these quick clarifications help you bring these fantastic **healthy potato side dishes** to your table tonight!
Can I speed up the cooking time for baked sweet potatoes?
That’s the million-dollar question, especially when you need **quick baked sweet potatoes** for a weeknight meal! While this specific recipe is designed for the oven—which I love because you can do a whole batch at once—you certainly can speed things up. The fastest way is using an air fryer! You typically halve the cooking time, usually getting perfectly tender results in about 20 to 25 minutes in the air fryer basket. But if you’re sticking to the oven like we are today, the key is just making sure your potatoes are medium-sized. If you use small ones, they finish much faster, closer to 35 minutes.
What is the difference between roasted sweet potatoes vs baked?
This is a great distinction to make! When we talk about true baking, as we are doing here for our **baked sweet potatoes**, we are using high heat but very little fat, relying on the potato’s internal moisture to steam the inside while the dry oven air crisps the outside skin. It’s a gentler texture outcome, which is key for fluffiness.
Roasting, on the other hand, usually involves cutting the potatoes—either into chunks or wedges—and coating them heavily in oil before tossing them on a sheet pan. Roasting creates more surface area contact with the oil and the heat, leading to more caramelization and chewier, browned edges rather than that soft, fluffy interior we aim for with this **simple sweet potato recipe**. Both are delicious, but their textures are totally different!
If you’re looking for other fantastic, easy ideas to round out your dinner menu, check out my list of Easy Lunch Ideas for inspiration later in the week!
Nutritional Estimate for This Easy Sweet Potato Recipe
I always like to give a heads-up about the nutrition, especially since we’re making such a simple and **healthy sweet potato side dish** here. Remember, the beauty of using just four primary ingredients (potato, oil, salt, pepper) is that the nutritional profile is super clean! You aren’t dealing with added sugars or heavy sauces like you might find in a casserole.
Please keep in mind that these figures are just estimates for one medium potato prepared exactly as written—no butter or toppings added yet! If you decide to drown it in sour cream and cheese, those numbers are going to jump up significantly, of course. I use these charts primarily just to make sure I’m sticking to my own goals, but they’re a great tool for anyone tracking macros when making these **baked sweet potatoes**.
- Serving Size: 1 potato
- Calories: 180
- Fat: 5g (Mostly the good stuff from olive oil!)
- Carbohydrates: 33g
- Fiber: 5g (That’s fantastic dietary fiber!)
- Protein: 4g
- Sugar: 9g (All natural sweetness from the sweet potatoes themselves!)
- Sodium: 230mg (This depends heavily on how much coarse salt you use!)
See? Super straightforward! This is why I tell everyone that mastering the simple bake is the foundation for so many other fantastic, healthy meals later in the week. It sets a wonderful baseline for whatever you decide to load it up with later.
Share Your Simple Sweet Potato Recipe Success
Wow, we made it! You now officially know Ethan’s absolute favorite, foolproof method for getting those perfect **baked sweet potatoes** with the crispy skin and super fluffy centers. I truly hope you enjoy the process as much as I do—it’s just so satisfying when the result is this good from such simple steps!
Now that you’ve given this recipe a try, I desperately want to hear what you thought! Did your family notice the difference once you ditched the foil? Please take a moment to leave a rating for the recipe below using the star system. It really helps me know which tried-and-true methods are making it onto your weekly dinner rotation.
More importantly, I want to see how you made these your own! Did you try that savory garlic butter variation we talked about? Or maybe you went in a totally different direction? My absolute favorite part of this whole process is seeing your creations in the comments section. Drop a note below telling me your best topping idea—whether it’s smoked paprika, goat cheese, or something totally unexpected. Getting feedback keeps the diary alive and lets me know what other simple things I should be tackling next!
If you loved this recipe and want to send me a note directly with a photo or just to say thanks, you can always reach out via the Contact Page! And if you’re already looking for more delicious inspiration, make sure you check out Carla’s fantastic recipe for Foolproof Baked Sweet Potatoes for any variations you might want to try next time!
PrintFoolproof Baked Sweet Potatoes: Crispy Skin & Fluffy Inside

Follow this simple, foolproof oven method to achieve perfectly baked sweet potatoes with a fluffy interior and delightfully crispy skin every time. This is the best way to bake sweet potatoes without foil, making it a quick and healthy side dish.
- Prep Time: 5 min
- Cook Time: 50 min
- Total Time: 55 min
- Yield: 4 servings 1x
- Category: Side Dish
- Method: Baking
- Cuisine: American
- Diet: Vegetarian
Ingredients
- 4 medium sweet potatoes (about 8–10 ounces each)
- 1 tablespoon olive oil
- 1 teaspoon coarse salt
- 1/2 teaspoon black pepper
Instructions
- Preheat your oven to 400 degrees Fahrenheit (200 degrees Celsius). Place an oven rack in the center position.
- Scrub the sweet potatoes well under running water to remove any dirt. Dry them completely with a paper towel. This step helps achieve crispy skin.
- Prick each sweet potato deeply 5 to 6 times all over using a fork. This allows steam to escape during baking.
- Rub the entire surface of each sweet potato with olive oil. Distribute the coarse salt and black pepper evenly over the oiled skins.
- Place the prepared sweet potatoes directly onto the center oven rack. Do not use foil or a baking sheet underneath.
- Bake for 45 to 60 minutes. The exact time depends on the size of your potatoes. The potatoes are done when the skin is slightly wrinkled and crispy, and you can easily pierce the center with a fork.
- Remove the potatoes from the oven. Let them rest on a cutting board for 5 minutes before serving.
- To serve, slice the potato lengthwise down the middle, being careful not to cut all the way through. Gently squeeze the ends to fluff up the inside flesh. Add your favorite toppings.
Notes
- For meal prep, bake the potatoes ahead of time. Store them whole in the refrigerator for up to 4 days. Reheat in the oven or microwave when ready to eat.
- If you prefer a savory baked sweet potato, top with garlic butter, chives, or shredded cheese after fluffing.
- To ensure a fluffy baked potato, make sure the potatoes are completely dry before oiling and seasoning.
Nutrition
- Serving Size: 1 potato
- Calories: 180
- Sugar: 9
- Sodium: 230
- Fat: 5
- Saturated Fat: 1
- Unsaturated Fat: 4
- Trans Fat: 0
- Carbohydrates: 33
- Fiber: 5
- Protein: 4
- Cholesterol: 0