
When the summer heat hits hard, sometimes the last thing you want to do is turn on the oven. That’s why having an incredible, make-ahead frozen dessert in your back pocket is essential. For me, this Ultimate No-Bake Oreo Crust Ice Cream Pie completely changed my dessert game. When my schedule got crazy busy running Little Kitchen Diary, I needed things that looked amazing for a party but required almost zero active cooking time. Trust me, this amazing ice cream pie became my secret weapon. It’s layered, it’s crunchy, and it’s the definition of an Easy Frozen Dessert that delivers big on flavor every single time. You’re going to love how simple the process is when you see the result! You can read more about my simple cooking philosophy over at the About page if you’re curious.
- Why This Ultimate No-Bake Oreo Crust Ice Cream Pie Is Your New Favorite Celebration Dessert
- Gathering Ingredients for Your Creamy Frozen Pie
- Step-by-Step Instructions for the Best Ice Cream Pie Recipe
- Tips for Success When Making a Homemade Ice Cream Cake Alternative
- Serving Suggestions for Your Crowd Pleaser Pie
- Storage and Reheating Instructions for Your Ice Cream Pie
- Frequently Asked Questions About This Ice Cream Pie
- Estimated Nutritional Data for This Indulgent Frozen Dessert
- Share Your Experience with This Ice Cream Pie
Why This Ultimate No-Bake Oreo Crust Ice Cream Pie Is Your New Favorite Celebration Dessert
If you’re anything like me, you need recipes that look totally gourmet but require absolutely no oven time, especially when summer rolls around. That’s the real magic of this No Bake Ice Cream Pie. It’s my go-to for parties because I can assemble the whole thing before lunch, and then it just sits happily in the freezer doing its thing until everyone arrives. It truly is an Easy Frozen Dessert powerhouse!

The Appeal of a Quick Ice Cream Dessert
Look at those details: Prep Time is only 25 minutes! Don’t let the Total Time scare you; most of that is hands-off freezing time. Honestly, I consider this a No Chill Pie Recipe because once those layers are in the freezer, I’m totally free to focus on everything else. You get maximum wow factor for minimal active effort, which is just brilliant when you’re hosting.
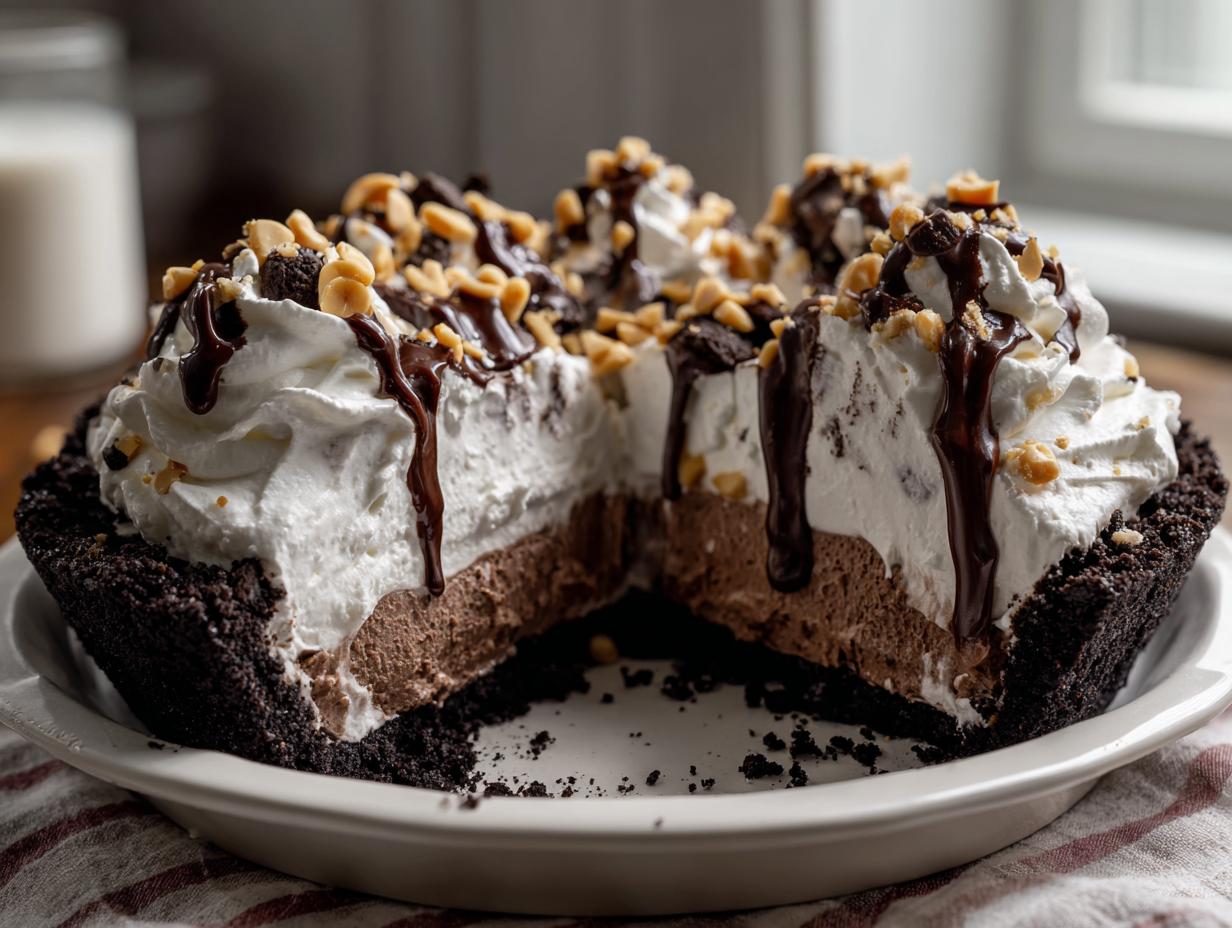
Layered Ice Cream Pie Perfection
What makes this structure so special is it’s a true Layered Ice Cream Pie. We aren’t just dumping one tub of ice cream in here. We start with that crunchy base, then the cool vanilla, followed by rich chocolate fudge, and it’s all topped with fresh homemade whipped cream. That combination of textures—crunchy, smooth, and airy—is what keeps everyone coming back for a second slice. It’s simple, but oh so effective!
Gathering Ingredients for Your Creamy Frozen Pie
Okay, getting your supplies together is actually the most straightforward part of this whole process. Since we aren’t baking, the quality of what we put in really shines through! You need to make sure your ice cream containers are sitting out for just a few minutes before you start so they soften up a bit—you want it spreadable, not soupy. Remember to crush up those Oreos thoroughly for the base!
For this triple-layer wonder, you’ll need the crushed Oreos, melted butter, softened vanilla ice cream, softened chocolate fudge ice cream, heavy whipping cream, powdered sugar, vanilla extract, that gorgeous warm hot fudge sauce, and finally, some chopped peanuts or chocolate shavings if you’re feeling fancy for the finish!
Ingredient Notes and Substitutions for Your Ice Cream Pie
I love that this recipe adapts so easily. If you run out of Oreos, no sweat! You can definitely swap that out for a buttery Graham Cracker Crust Pie base. Just mix about 1.5 cups of graham crumbs with a little sugar and melted butter. Also, if you only have one type of ice cream on hand, don’t panic! You can absolutely use two containers of the same flavor. Just spread the first layer, freeze it hard, and then before adding the second scoop, sprinkle in a layer of crushed cookies or even some peanut butter straight from the jar. It adds that necessary texture!
Step-by-Step Instructions for the Best Ice Cream Pie Recipe
Alright, let’s get this show on the road! Even though this is a No Bake Ice Cream Pie, timing the freezing steps is everything. You really can’t rush the hard freeze between layers—that’s how you keep everything neat and defined. Read through these steps before you even grab your mixer, I promise it saves headaches later on when you’re trying to manage softened ice cream!
Creating the No Bake Ice Cream Pie Crust
First things first, we build the foundation. You’re going to take your crushed Oreos and mix them really well with that melted butter until every crumb is coated. Now, the most important part of this step for your Oreo Crust Pie integrity is pressing! Use the bottom of a flat measuring cup or just your fingers to really pack that mixture down into your 9-inch pie plate. Don’t be shy! Once it’s tight and even up the sides, pop it straight into the freezer for at least 30 minutes. It needs to be rock solid before the soft ice cream hits.
Layering the Ice Cream Filling
Once your crust is set, it’s layer time. Take your already softened vanilla ice cream and gently spread it right over that cold crust. Smooth it out nice and flat, and then immediately send it back to the deep freeze for a solid hour until it’s completely firm again. You want it hard to the touch! Next, repeat that with the chocolate fudge ice cream layer on top of the set vanilla. Smooth that one down evenly too, and freeze it for another hour or two. Seriously, each layer needs to be solid before you move on, otherwise, you just get a muddy swirl instead of distinct layers in your final Creamy Frozen Pie.
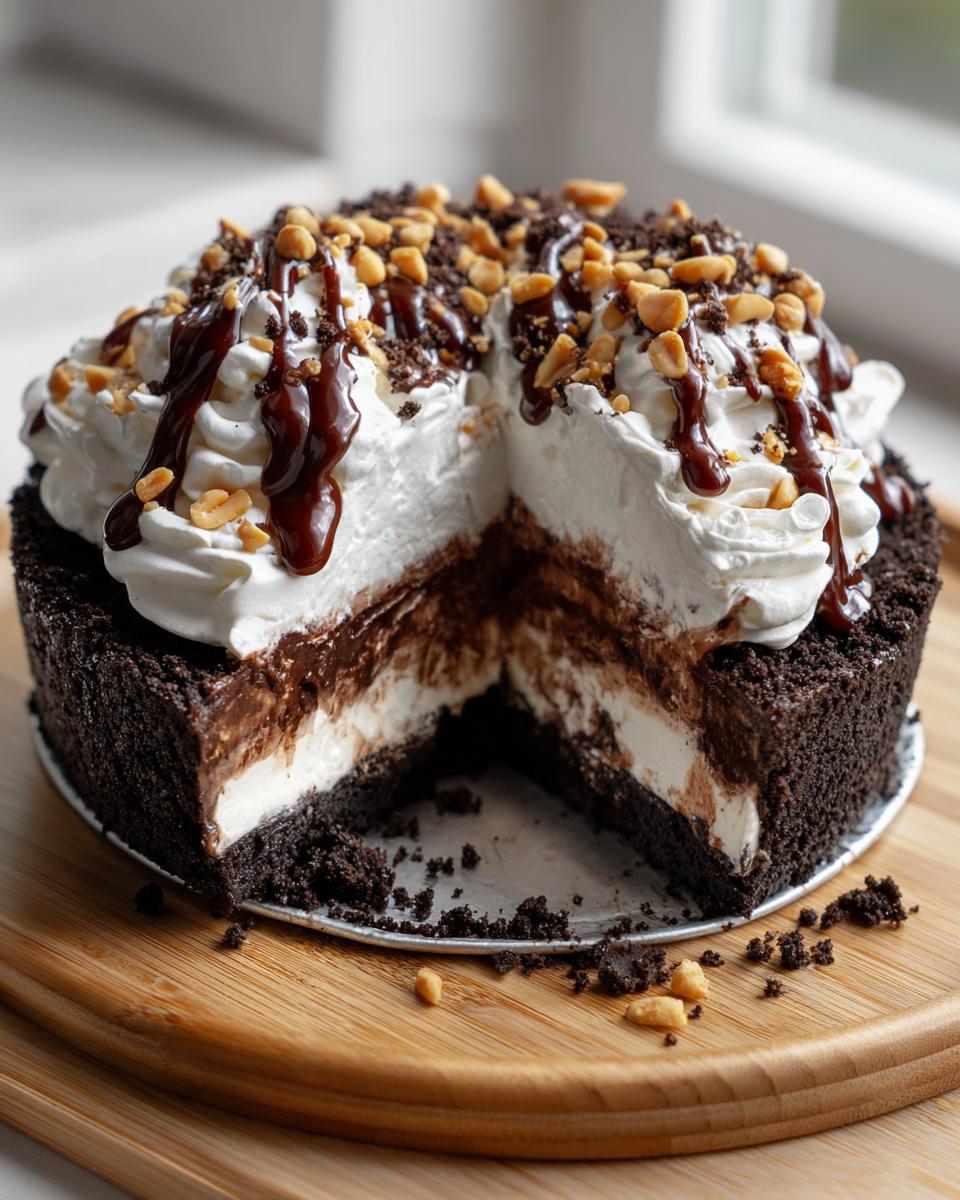
Finishing Touches and Final Freeze for Your Ice Cream Dessert for Parties
Now for the beautiful top! Whip your heavy cream, powdered sugar, and vanilla until you get stiff, beautiful peaks—that means it holds its shape when you lift the whisk. Gently spread that fluffy topping over your firm chocolate layer. Then, drizzle that warm hot fudge sauce lovingly over the top—the contrast in temperature is fun! Sprinkle on those peanuts or chocolate shavings. Here comes the crucial last wait: return your masterpiece to the freezer for a minimum of four hours, though overnight is always best for the truly perfect slice. If you want more ideas for great desserts that hold up well, check out this huge list of frozen ice cream pie recipes!
Tips for Success When Making a Homemade Ice Cream Cake Alternative
Even though this is a no-bake recipe, there are a couple of things I learned the hard way that really make serving this gorgeous ice cream pie go smoothly. The biggest headache is always slicing! If you try to cut it straight out of the deep freeze, you’re going to end up with shards instead of slices, and nobody wants that.
Trust me on this one: just let the finished pie sit on the counter for about 5 to 10 minutes before you attempt to cut into it. That little bit of time gives the filling just enough relief to release cleanly from the crust. Also, always wipe your knife clean between slices—it keeps those beautiful chocolate and vanilla layers looking crisp and defined for every single guest!
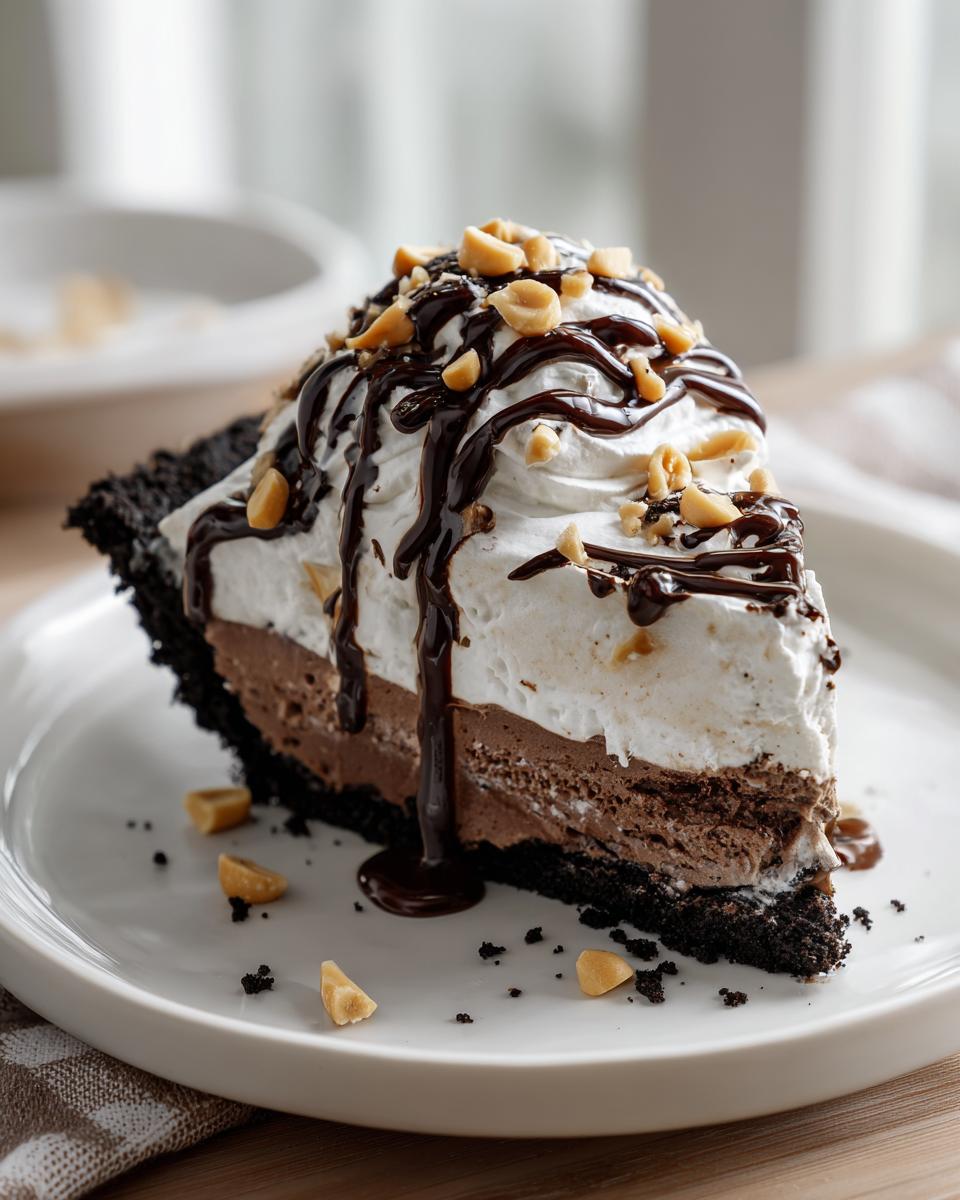
Serving Suggestions for Your Crowd Pleaser Pie
Since this ice cream pie is so incredibly rich, I find that light, bright pairings are the way to go when serving it up. This really is the perfect Make Ahead Frozen Treat!
I love serving a slice next to some fresh, tart raspberries or maybe a few slices of bright kiwi. The acidity cuts right through the fudge and the creaminess of the layers beautifully. If you’re serving this for a summer BBQ, skip heavy sauces and stick to just a light dusting of cocoa powder on the plate. It looks elegant, tastes incredible, and doesn’t weigh your guests down. Enjoy that refreshing contrast!

Storage and Reheating Instructions for Your Ice Cream Pie
Because this is the ultimate frozen dessert, storage is actually super simple, which is wonderful for meal planning! The key here is preventing freezer burn and keeping those crisp little Oreo crumbs protected. Once your ice cream pie is totally set after that final long freeze, you need to wrap it up like a precious gift.
I recommend covering the whole thing tightly with plastic wrap first—make sure you press the wrap down lightly over the surface of the whipped cream topping to avoid any direct contact that might cause ice crystals. Then, slide the whole thing into a large, sealed freezer bag or an airtight container. This keeps the texture perfect!
Now, about ‘reheating’—that’s a funny word for a frozen pie, isn’t it? We aren’t heating this up, of course! ‘Reheating’ in this case just means controlled thawing so you can actually get a clean slice. If you plan to serve leftovers later in the week, just pull the wrapped pie out of the freezer about 15 to 20 minutes before you want to cut into it. That little bit of rest time outside the deep freeze is all you need to make sure your knife glides through beautifully. It stays perfectly frozen while the very outer edge gets just soft enough to handle!
Frequently Asked Questions About This Ice Cream Pie
I always get tons of great questions whenever I post about this recipe—it just goes to show how many people want an incredible ice cream pie in their life without the fuss! Here are some of the things I hear most often about turning this into the Best Ice Cream Pie Recipe for your house.
Can I use a Graham Cracker Crust Pie base instead of Oreos?
Absolutely, yes! If you prefer that classic buttery, slightly salty base, feel free to swap out the Oreos. For the perfect Graham Cracker Crust Pie, use about 1.5 cups of finely crushed graham crackers, mix that with about a quarter cup of granulated sugar, and then use 6 tablespoons of melted butter. Press it into the pan just like you would with the Oreos, and make sure you give it that initial good freeze before layering in your ice cream!
How far in advance can I make this No Bake Ice Cream Pie?
This is my favorite part about making this No Bake Ice Cream Pie—it is designed to be made ahead! I usually assemble the whole thing the day before I plan to serve it, just to make sure those layers have time to completely rock-solid set up overnight. But honestly, if you wrap it really well—and I mean really well—you can easily keep this stunning Make Ahead Frozen Treat good in the freezer for up to two weeks. Just make sure it’s tightly sealed!
What if I only have one flavor of ice cream for my Layered Ice Cream Pie?
Don’t worry about that! While the three layers make such a fun result, you can totally manage with just one type of ice cream for your Layered Ice Cream Pie. The trick is adding texture back in since you’re missing that second flavor profile. After you spread and freeze your first layer of ice cream, instead of immediately adding the second layer of the same ice cream, scatter a nice, even layer of crushed leftover Oreos (or maybe some peanut butter) across the top. Freeze that for 30 minutes, and then add your second layer of softened ice cream. It gives you that great texture surprise without needing to buy two different tubs!
If you try this out and have any other questions or just want to let me know how it went, please reach out to me via the contact page. I love hearing from you all!
Estimated Nutritional Data for This Indulgent Frozen Dessert
Now, I know what you’re thinking: this Indulgent Frozen Dessert looks incredible, but is it going to ruin my day nutritionally? Well, since this is a triple-layer cream and cookie bomb, let’s be real—it’s a treat! But I always want to be transparent with you here at Little Kitchen Diary about what goes into these amazing recipes.
Please remember that these numbers are based on the standard ingredients I used in my testing, so think of them as a very well-educated estimate. If you swap out Oreos for different cookies, or use light coconut cream instead of heavy cream, the numbers change! But for the recipe as written, here’s a rough guide per slice (that’s 1/8th of the pie):
- Calories: About 450
- Fat: Around 28g
- Carbohydrates: Roughly 48g
- Protein: Hanging out at 6g
- Sugar: A fair bit at 45g
It’s definitely a dessert meant for special occasions or when you just need that bit of sweet comfort. That’s why we love making it as a Crowd Pleaser Pie—you just enjoy the slice you have and savor every bit of that creamy, crunchy goodness!
Share Your Experience with This Ice Cream Pie
Okay friends, now it is officially your turn! I have shared my absolute favorite way to make a show-stopping, easy, no-bake ice cream pie, and I really hope you give it a try, especially the next time you need a seriously impressive Celebration Dessert. Seriously, whipping this up always makes me feel like I have my life together, even if I’ve been running around all day!
Once you’ve let your pie freeze completely and you’ve served up those perfect slices, I would absolutely love to hear how it went! Did you stick to the vanilla and chocolate fudge layers? Or did you go wild? Maybe you successfully made that Peanut Butter Ice Cream Pie variation I mentioned, or tried a S’mores-inspired topping—tell me everything!
Leaving a quick star rating right here on the page helps other busy home cooks know this Quick Ice Cream Dessert is a winner, and those flavor variation notes are gold for me as I keep documenting my kitchen adventures for Little Kitchen Diary. Your feedback helps us all cook a little better and a little joyfully. Don’t forget to review our site guidelines over at the Terms of Use page if you’re leaving detailed comments!
Happy freezing, everyone!
PrintUltimate No-Bake Oreo Crust Ice Cream Pie with Three Layers of Flavor

Make this easy, no-bake ice cream pie featuring a crunchy Oreo crust and three distinct, creamy layers. This frozen dessert is perfect for parties or a satisfying make-ahead treat.
- Prep Time: 25 min
- Cook Time: 0 min
- Total Time: 4 hours 25 min
- Yield: 8 servings 1x
- Category: Dessert
- Method: No-Bake/Freezing
- Cuisine: American
- Diet: Vegetarian
Ingredients
- 2 cups crushed Oreo cookies
- 6 tablespoons unsalted butter, melted
- 1 (1.5 quart) container vanilla ice cream, softened
- 1 (1.5 quart) container chocolate fudge ice cream, softened
- 1 cup heavy whipping cream
- 1/4 cup powdered sugar
- 1 teaspoon vanilla extract
- 1/2 cup hot fudge sauce, warmed
- 1/4 cup chopped peanuts or chocolate shavings for topping
Instructions
- Prepare the crust: Mix the crushed Oreo cookies and melted butter in a bowl until the crumbs are evenly moistened. Press this mixture firmly into the bottom and up the sides of a 9-inch pie plate. Freeze the crust for at least 30 minutes.
- First layer: Spread the softened vanilla ice cream evenly over the frozen Oreo crust. Return the pie to the freezer and freeze for at least 1 hour, or until firm.
- Second layer: Spread the softened chocolate fudge ice cream over the hardened vanilla layer. Smooth the top. Freeze for another 1 to 2 hours, or until completely firm.
- Prepare the topping: In a medium bowl, beat the heavy whipping cream, powdered sugar, and vanilla extract with an electric mixer until stiff peaks form. This creates your whipped cream topping.
- Assemble the pie: Spread the whipped cream mixture over the frozen chocolate fudge layer. Drizzle the warm hot fudge sauce over the whipped cream. Sprinkle with chopped peanuts or chocolate shavings.
- Final freeze: Freeze the finished ice cream pie for at least 4 hours, or preferably overnight, before slicing and serving.
Notes
- If you do not have two different ice cream flavors, you can use two containers of the same flavor and add a layer of crushed cookies or peanut butter between them for texture.
- For easier slicing, let the pie sit at room temperature for 5 to 10 minutes before cutting.
- You can substitute the Oreo crust with a graham cracker crust if you prefer a different flavor base.
Nutrition
- Serving Size: 1 slice
- Calories: 450
- Sugar: 45g
- Sodium: 280mg
- Fat: 28g
- Saturated Fat: 16g
- Unsaturated Fat: 12g
- Trans Fat: 0.5g
- Carbohydrates: 48g
- Fiber: 2g
- Protein: 6g
- Cholesterol: 65mg