
We all have those events, right? The neighborhood barbecue, the family reunion, or maybe just a busy Tuesday where you desperately need a side dish that pulls double duty as a showstopper and something you can make completely ahead of time. Trust me, my career used to be so hectic that my kitchen got quiet for way too long. It took a conscious effort to get back to cooking simple, joyful meals, and that’s exactly what led me to perfect the absolute champion of reliable sides: the **7 layer salad**. This isn’t some complicated five-hour endeavor, friends; this is the ultimate, ridiculously easy, make-ahead salad that always looks like you spent twice as long on it. You’re going to love how sturdy and flavorful it stays, even hours after you assemble it. Welcome back to the kitchen—I’m Ethan, and we’re making history simple, one layer at a time.
- Why This Classic 7 Layer Salad is Your New Potluck Favorite
- Gathering Ingredients for Your 7 Layer Salad
- Step-by-Step Instructions for the Best Seven Layer Salad
- Tips for Success with Your Classic 7 Layer Salad Recipe
- Variations on the Classic 7 Layer Salad
- Serving Suggestions for this Entertaining Salad Recipe
- Storage and Reheating Instructions for Your Make Ahead Salad
- Frequently Asked Questions About the 7 Layer Salad
- Estimated Nutrition for the Classic 7 Layer Salad
Why This Classic 7 Layer Salad is Your New Potluck Favorite
Honestly, sometimes the best dishes are the ones we remember from decades ago. This classic 7 layer salad is living proof that good ideas never die, especially when they are as practical as this one. It’s designed specifically for folks like us who need reliable, delicious **Easy Potluck Salads**. You can find great inspiration for these kinds of retro sides, like this one, that prove simple assembly works best.
- It’s the ultimate **Make Ahead Salad**; you assemble it, cover it, and forget it until party time.
- The distinct layers mean everyone gets a little bit of everything in every single forkful.
- It travels beautifully because the structure holds up so well in transit.
The Secret to Perfect Make Ahead Salad Assembly
The magic isn’t just in the ingredients; it’s in the order! By layering the hard veggies and peas *under* the creamy dressing, they stay crisp. Then, we completely seal the whole thing with a thick layer of that dressing on top. That seal keeps the air out and stops anything underneath from wilting. Trust me, I learned this the hard way early on!
Gathering Ingredients for Your 7 Layer Salad
Okay, let’s talk components. Since this is a building project, assembly needs to be smooth, which means getting all your ducks in a row—your little cups of cheese, your bowl of bacon, everything ready to go. I always encourage people to visit recipes like this just to compare notes on layering, but stick to these core items, and you’ve got the classic flavor profile down pat. We need texture, crunch, and that wonderful richness!
- One head iceberg lettuce, finely chopped—this makes up our crisp base.
- One cup of frozen peas, but you gotta thaw them first! Cold peas on room temperature veggies just don’t work well.
- One cup celery, chopped nice and small.
- One cup red onion, diced small so you get onion flavor, not just onion chunks.
- One cup shredded sharp cheddar cheese—the good stuff!
- Six slices of bacon, cooked until crispy and crumbled up.
- Four large eggs, hard-boiled and then sliced neatly.
Dressing Ingredients for the Creamy Layered Salad
The dressing is what ties this whole thing together, making it a true **Salad with Creamy Dressing**. It’s super simple, but nailing the balance on the sugar and acid is key so it doesn’t taste too heavy or too sharp. You’ll want to whisk up:
- One full cup of mayonnaise.
- Two tablespoons of white vinegar—this gives a little necessary tang!
- One tablespoon of sugar. No more, no less for that slight sweetness.
- One teaspoon of salt and just half a teaspoon of black pepper.
Step-by-Step Instructions for the Best Seven Layer Salad
Alright, we’ve got all our little piles of goodness ready to go. This part is pure theatre! Since we’re aiming for the **Best Seven Layer Salad**, the order is everything. Before you start stacking, take your dressing—that creamy mix we just whisked up—and set about half of it aside for the very top layer. We’re using the other half midway through. You can certainly check out this guide for visual inspiration, but following our layering structure is key to avoiding a sloppy mess!
Assembling the Layers of Your Vegetable Layer Salad
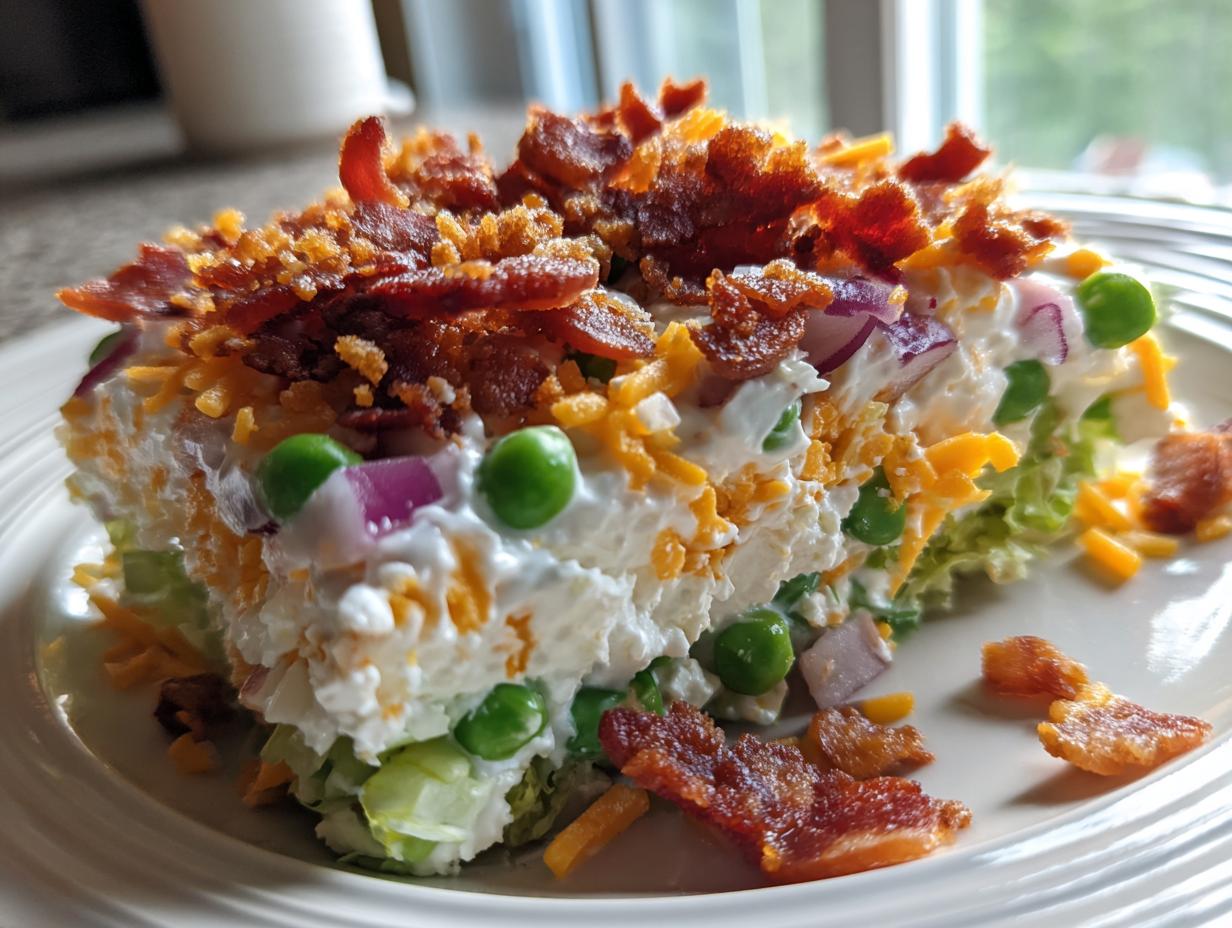
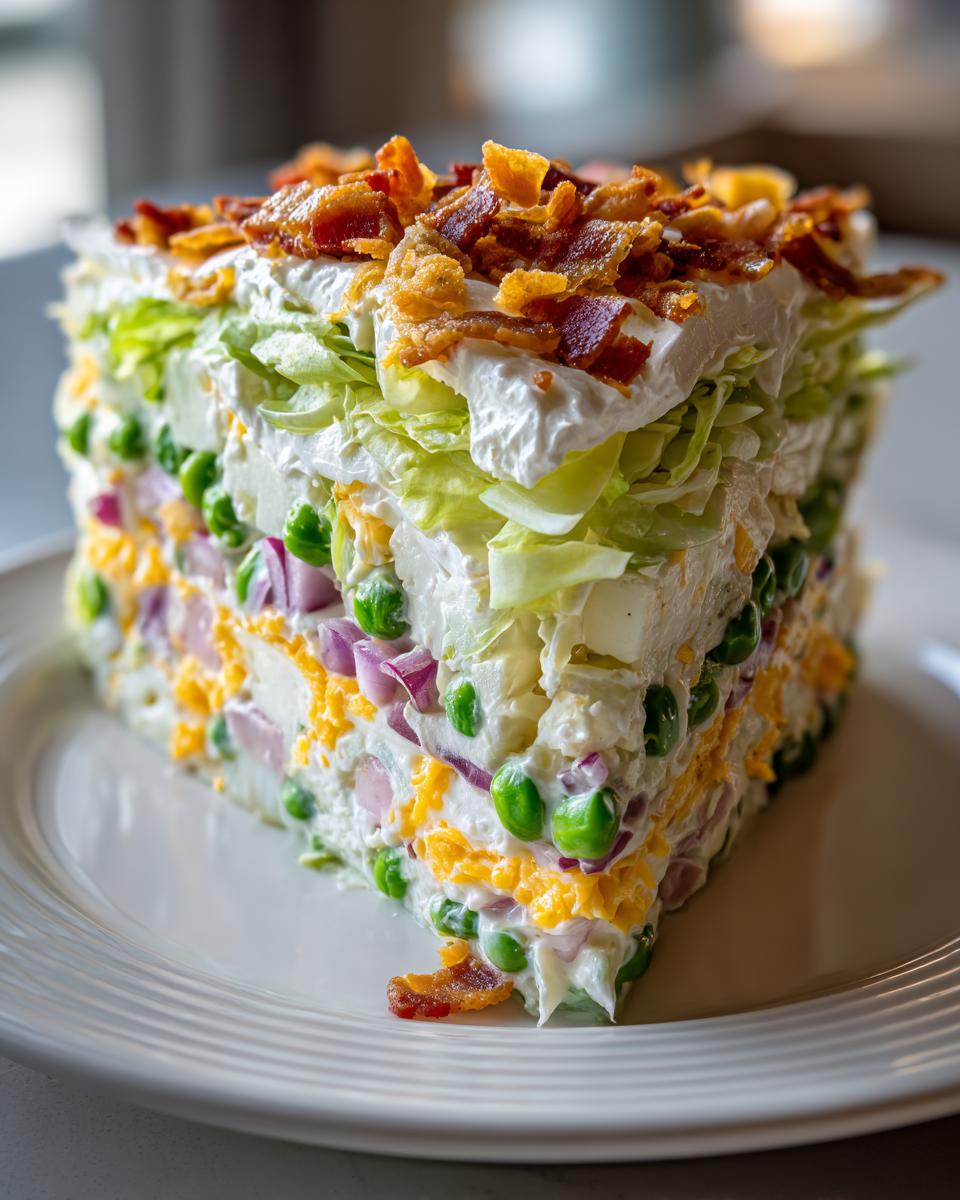
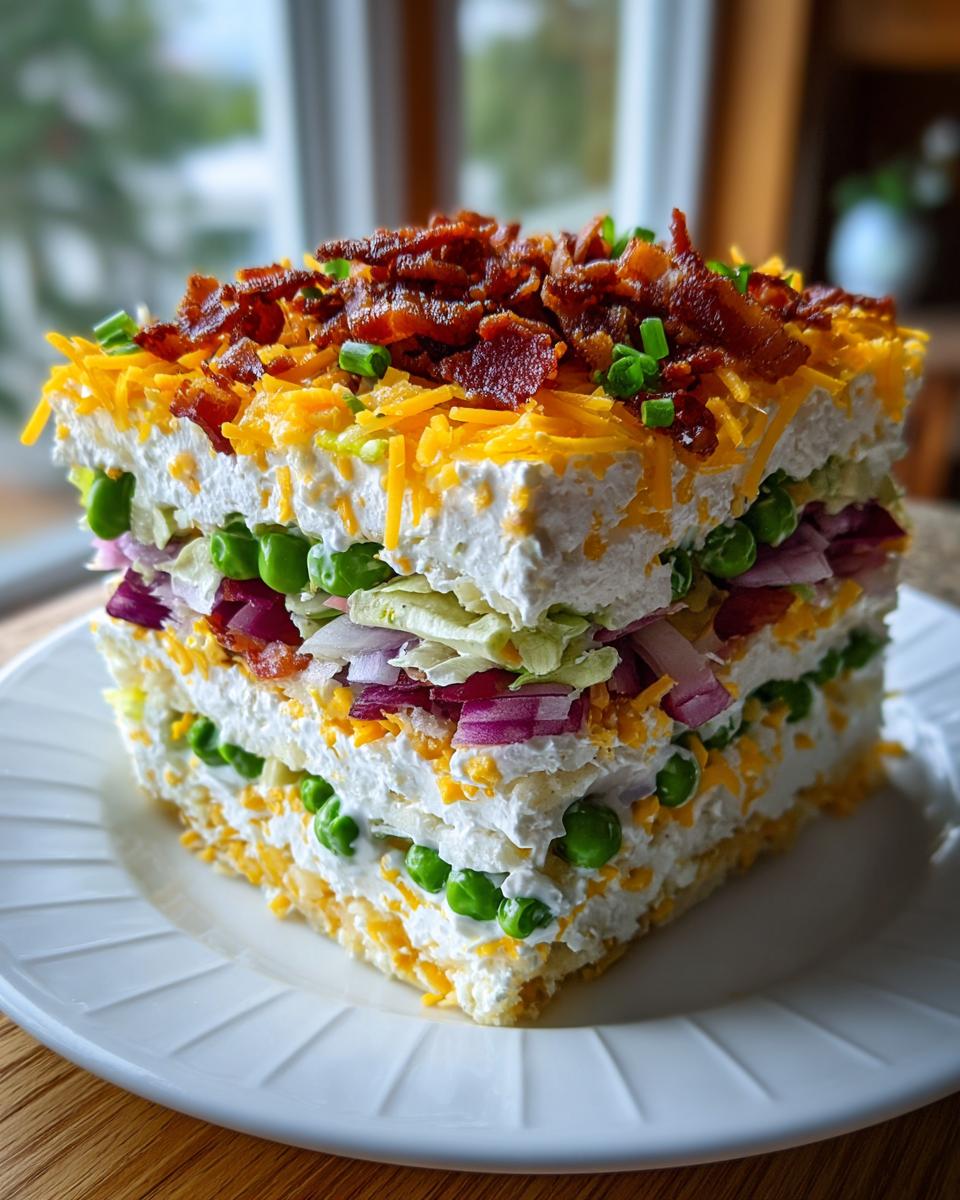
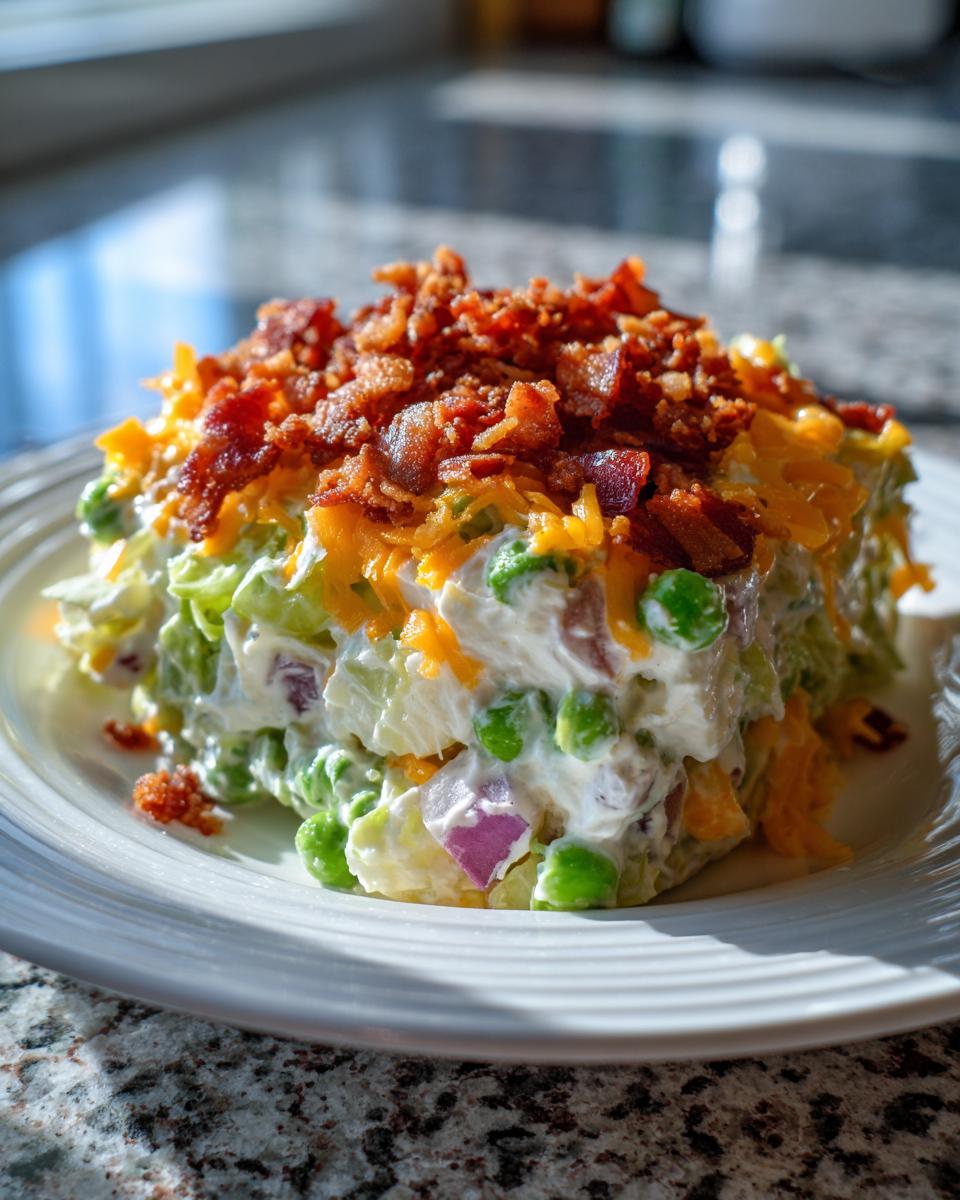
Grab your big glass bowl—presentation matters here! You start by spreading out half of your chopped lettuce. Then, you add all the peas, followed by half of the celery, half the onion, half the cheese, half the bacon, and half the sliced eggs. Make sure you smooth out that first half of the dressing evenly over that second layer for insulation. Then, we just repeat that entire sequence one more time with the rest of the vegetables, bacon, and eggs on top.
Chilling Time: Essential for a Perfect 7 Layer Salad
This is the step people are tempted to skip, but please don’t! Once everything is stacked, spread the remaining dressing right over the top layer—this acts like a protective lid. Cover that bowl up super tight with plastic wrap. You absolutely have to chill this for a minimum of four hours. Honestly, if you can leave it overnight, that’s even better. This time lets all those crisp veggies soak up a tiny bit of flavor from the dressing, making it an amazing **Cool Layered Side Dish** without getting soggy.
Tips for Success with Your Classic 7 Layer Salad Recipe
When I started logging these older recipes, I realized that the best ones can handle a little on-the-fly adjusting, as long as you respect the structure. This **Classic Layered Salad Recipe** is robust, but a few tricks will take it from great to absolutely unforgettable, especially if you’re making it for a big crowd. Think about what makes a good side dish for a big event—it needs to hold up, right?
Ingredient Substitutions for Your 7 Layer Salad
Don’t stress if you’re missing one small thing! The flexibility here is wonderful. You mentioned cheddar cheese in the ingredients, but if you aren’t a huge fan, using Monterey Jack or even a smooth Colby works just as well. It’s all about that creamy melt against the crisp veggies! Also, you can bulk up the vegetable layers easily. I often toss in about a cup of chopped sweet bell peppers—red or yellow look gorgeous against the green lettuce and peas. Check this out if you want another classic take on assembly!
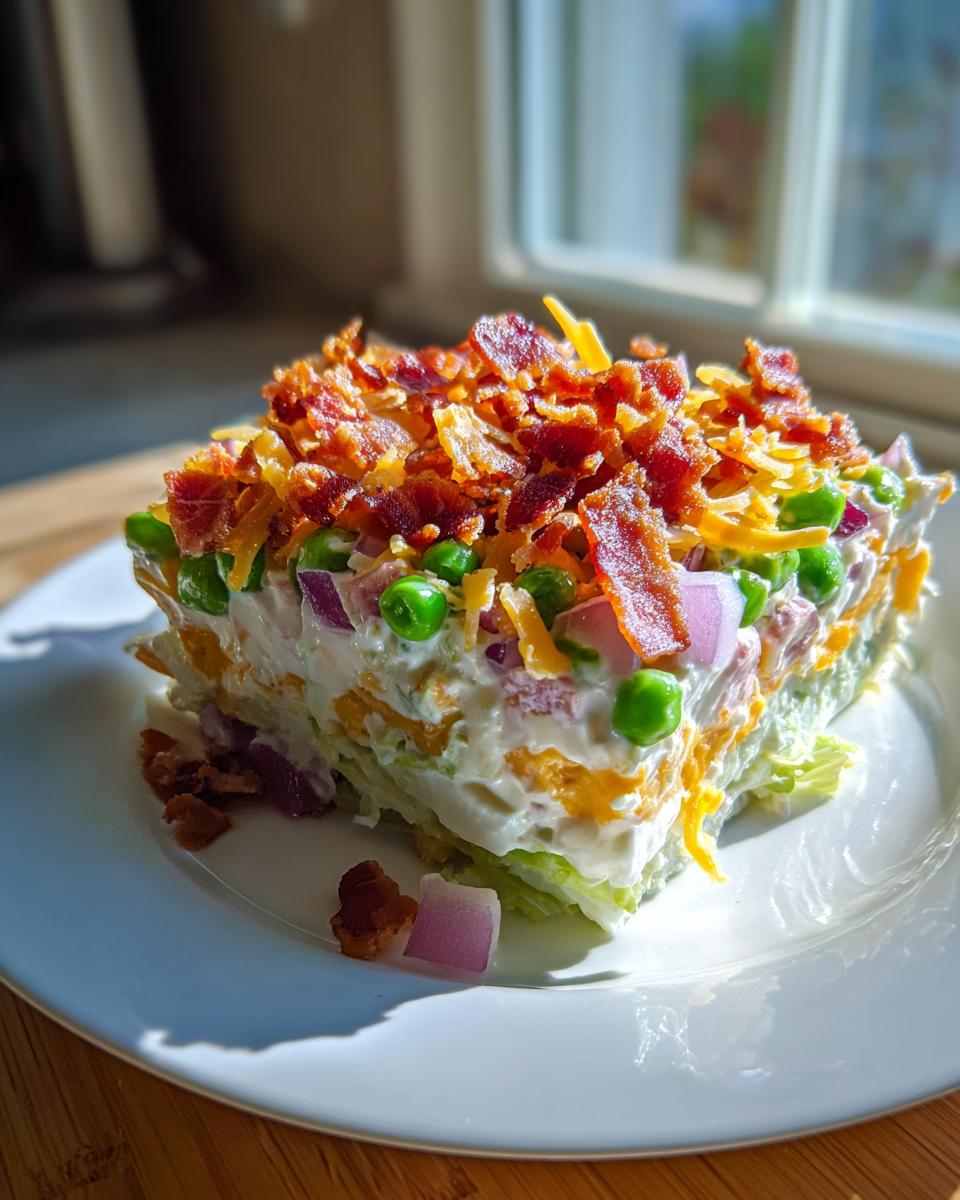
Now, here is the most important texture tip: the bacon. Cook it until it’s shatteringly crisp, but unless you are serving this within an hour of assembly, you absolutely must keep those crumbled bits saved separately. Sprinkle them over the top right before you walk out the door, or just before it hits the table. If they sit in that dressing overnight, bye-bye crunch! We want that salty, smoky pop in every bite.
Variations on the Classic 7 Layer Salad
While this classic lettuce, pea, and bacon setup is truly perfect, sometimes you just need to shake things up a bit, especially if you’re serving this **7 layer salad** to the same crowd every summer. The beauty of the layered format is that you can take the technique and just swap out the flavor profile completely! You still need that protective dressing layer on the bottom and the top, but everything in between can be totally different.
If you’re looking to go totally outside the box, you could try a **Seven Layer Taco Salad Variation**. Instead of lettuce, maybe the primary base layer is crushed tortilla chips! Then you layer on seasoned ground beef (or black beans), shredded lettuce, cheese, tomatoes, sour cream, and maybe a crunchy salsa layer. It becomes a very different, fantastic meal, but you keep that satisfying structure. For a less dramatic change, try swapping the cheddar for Monterey Jack or adding a layer of chopped hard-boiled eggs and using a ranch dressing instead of mayo—it’s still that great creamy vibe. See how flexible this format is? You can use ideas like this for inspiration!
Serving Suggestions for this Entertaining Salad Recipe
When do I pull this beauty out? Honestly, any time I need a reliable, vibrant, make-ahead side dish! This **7 layer salad** is a natural fit for summer picnics because it travels so well when covered tightly. It makes a fantastic, cool counterpoint to rich BBQ fare like pulled pork or grilled chicken. If you are heading to a holiday meal, this is one of those classic dishes that everyone expects!
It pairs wonderfully with simpler mains so the layers can shine through. Think about serving it alongside baked ham for Easter or Christmas—it instantly upgrades your plate from heavy to fresh. You can find tons of great ideas for building out your party spread like this. Just remember to keep it chilled until serving time!
Storage and Reheating Instructions for Your Make Ahead Salad
Because this salad is so sturdy, saving leftovers is super easy! The biggest thing to remember, just like when assembling it, is that tight seal. Keep that plastic wrap pressed right up against that top layer of dressing. It should stay crisp and delicious in the fridge for a full day, maybe even pushing 36 hours, though the lettuce will start getting a little softer by then—that’s just the way cold salads go.
When you pull out the leftovers, the dressing might look a little separated, but don’t fret! Just give it a gentle stir right in the bowl before serving it cold again. If you want that beautiful top layer to look perfect, you might want to grab a fresh piece of bacon and sprinkle a few crumbles on top just before it hits the dinner table again. You can see some great family tips over here!
Frequently Asked Questions About the 7 Layer Salad
I totally get it—when you’re planning a big menu, you’ve got questions! I always field these same questions every time I take this to a gathering. Here are the things I hear most often about putting together this essential **Easy Potluck Salad**.
Can I make this 7 Layer Salad with fewer layers?
You absolutely *can*, but honestly, where’s the fun in that? The whole point of this **Vegetable Layer Salad** is that visual pop and ensuring every bite is balanced. If you’re strapped for time, at the very least, you need the foundation (lettuce), the crunch (veggies), the richness (cheese/eggs), and of course, that creamy dressing, which needs to be smothered on top! If you leave off the eggs, for example, it’s just a 6 layer salad, but it’ll still taste great. Check out the classic ways people build theirs over at The Gunny Sack!
How long can I keep this Salad with Creamy Dressing refrigerated?
This is where the ‘make-ahead’ part comes in handy! If you follow my wrapping instructions—really sealing it tight—this salad is fantastic for up to a full 24 hours once assembled. I think that’s the sweet spot for peak crispness. You can sometimes push it to 48 hours, but the lettuce at the very bottom will start losing its snap a little bit. It’s still edible, just less vibrant. For the very best texture, nothing beats assembling it the day before you need it, making sure to save that top bacon crumble for serving, as I mentioned before. Anthony’s Kitchen has a great note on timing, too!
Estimated Nutrition for the Classic 7 Layer Salad
I always include these numbers because I know some of you track things closely, even when serving up a crowd-pleasing classic like this! Please remember these figures are just an estimate based on the standard ingredients we used in the main recipe, so your brand of mayo or cheese could make them shift a tiny bit. You can see a great breakdown of why these estimates matter over at Yume & Easy Meals when you’re comparing recipes!
- Serving Size: 1 serving
- Calories: 310
- Sugar: 5g
- Sodium: 350mg
- Fat: 27g
- Protein: 9g
That creamy dressing definitely puts the fat content up, but wow, is it worth it for that amazing taste! This is definitely satisfying comfort food disguised as a salad.
PrintClassic 7 Layer Salad: Easy Make-Ahead Potluck Recipe

Make the ultimate classic 7 layer salad for any gathering. This recipe features fresh ingredients and vibrant layers for an easy side dish perfect for potlucks.
- Prep Time: 25 min
- Cook Time: 10 min
- Total Time: 35 min
- Yield: 8 servings 1x
- Category: Side Dish
- Method: Assembly
- Cuisine: American
- Diet: Vegetarian
Ingredients
- 1 head iceberg lettuce, chopped
- 1 cup frozen peas, thawed
- 1 cup chopped celery
- 1 cup chopped red onion
- 1 cup shredded cheddar cheese
- 6 slices bacon, cooked and crumbled
- 4 hard-boiled eggs, sliced
- 1 cup mayonnaise
- 2 tablespoons white vinegar
- 1 tablespoon sugar
- 1 teaspoon salt
- 1/2 teaspoon black pepper
Instructions
- Prepare the dressing: In a small bowl, whisk together the mayonnaise, white vinegar, sugar, salt, and pepper until smooth. Set aside.
- Prepare the layers: In a large glass bowl, begin layering the ingredients in the following order: half of the chopped lettuce, all of the thawed peas, half of the celery, half of the red onion, half of the cheddar cheese, half of the bacon, and half of the egg slices.
- Spread half of the prepared dressing evenly over the second layer.
- Repeat the layering process with the remaining lettuce, celery, onion, cheese, bacon, and eggs.
- Spread the remaining dressing over the top layer.
- Cover the bowl tightly with plastic wrap. Refrigerate for at least 4 hours, or preferably overnight, to allow the flavors to meld.
- Before serving, sprinkle the remaining bacon crumbles over the top layer. Serve cold.
Notes
- You can assemble this salad up to 24 hours in advance. Keep it tightly covered in the refrigerator.
- For a crispier top layer, wait to sprinkle the bacon until just before serving.
- This recipe is a great base; feel free to substitute ingredients like adding chopped bell peppers or using Monterey Jack cheese instead of cheddar.
Nutrition
- Serving Size: 1 serving
- Calories: 310
- Sugar: 5
- Sodium: 350
- Fat: 27
- Saturated Fat: 9
- Unsaturated Fat: 18
- Trans Fat: 0
- Carbohydrates: 10
- Fiber: 3
- Protein: 9
- Cholesterol: 75